| Intrallect intraLibrary 3.3: Administrator's Guide |
| Intrallect intraLibrary 3.3: Administrator's Guide |
| 1. | Introduction |
| 2. | Users |
| 2.1. | Adding New Users |
| 2.2. | Assigning Users to Groups |
| 2.3. | Modifying a User's Properties |
| 2.4. | Mimicing a User |
| 2.5. | System Settings for Users |
| 3. | System Roles |
| 4. | Groups and Workflows |
| 4.1. | Introduction |
| 4.2. | Submission Workflow |
| 4.2.1. | Properties of a Workflow |
| 4.2.2. | Properties of a Workflow Stage |
| 4.2.3. | Workflow Actions |
| 4.2.4. | Process Completion Criteria |
| 4.2.5. | Editing Workflows |
| 4.2.5.1. | Creating a New Workflow |
| 4.2.6. | Example Workflow Definitions |
| 4.2.6.1. | Example 1: Basic intraLibrary Workflow |
| 4.2.6.2. | Example 2: Contribute, Catalogue, Review |
| 4.2.6.3. | Example 3: Advanced Cataloguing Workflow |
| 4.2.6.4. | Example 4: Simple Content Managing Workflow |
| 4.2.7. | Working on Resources |
| 4.2.8. | Defining a Workflow for Use in intraLibrary |
| 4.2.9. | Removing Users and Groups |
| 4.3. | Working in Groups and Workflows |
| 4.3.1. | Relationship Between Groups and Workflows |
| 4.3.2. | Group Roles |
| 4.3.3. | Access to Resources in a Workflow |
| 4.3.4. | Work Area |
| 5. | Collections |
| 5.1. | Introduction |
| 5.2. | Properties of Collections |
| 5.2.1. | Summary of Collection Properties |
| 5.2.2. | Relationship to Classification Systems |
| 5.2.3. | Relationship to Application Profiles and Licence Models |
| 5.3. | Managing Collections |
| 5.4. | Managing Access |
| 5.4.1. | Relationship to Groups of Users |
| 5.4.2. | Access Permissions |
| 5.4.3. | Contributing to a Collection |
| 5.5. | Controlling Remote Access to Collections |
| 5.6. | An Example of Using Collections |
| 5.7. | Precedence Issues |
| 6. | Metadata and Vocabularies |
| 6.1. | Introduction |
| 6.2. | Configure Application Profiles |
| 6.3. | Edit an Application Profile |
| 6.4. | Manage Vocabularies |
| 6.5. | Metadata Subsets |
| 7. | Search |
| 7.1. | Configure Search |
| 7.1.1. | Simple Search |
| 7.1.2. | Advanced Search |
| 7.1.3. | Reference Search |
| 7.1.4. | Full Text Search |
| 7.1.5. | Classification Search |
| 7.2. | Public Saved Searches |
| 8. | Agreements |
| 9. | Licences |
| 9.1. | Introduction |
| 9.2. | Licensing Model |
| 9.3. | Depositing Resources |
| 9.4. | Accessing Resources |
| 9.5. | Configuring the System |
| 9.6. | What Community Licensing Doesn't Do |
| 9.7. | Technical Solution |
| 9.8. | References on Licensing |
| 10. | System |
| 10.1. | User Options |
| 10.2. | Metadata Options |
| 10.3. | RSS Options |
| 10.4. | System Options |
| 10.5. | Tech Summary |
| 10.6. | Open Access |
| 11. | Support Login |
| 11.1. | When You Need Support |
| 11.2. | What Support Access Is |
| 11.3. | Activating Support Access |
| 11.4. | De-Activating Support Access |
| 12. | Mail Configuration |
| 12.1. | Email Basics |
| 12.2. | Configuring the SMTP Settings |
| 12.3. | Testing Mail Settings |
| 13. | Metadata Reports |
| 13.1. | Configuring Metadata Reports |
| 13.2. | Saving Metadata Report Templates |
| 13.3. | Repository Statistics |
| 14. | Maintenance |
| 14.1. | Resource Cache |
| 14.2. | Search Index (Re-index Metadata) |
| 14.3. | Image Thumbnails |
| 14.4. | Metadata Templates |
| 15. | Metadata Templates |
| 15.1. | Introducing Metadata Templates |
| 15.2. | Creating Metadata Templates |
| 15.3. | Service Result Templates |
| 15.4. | Template Format |
| 16. | Email Templates |
| 16.1. | Email Alerts for Stage Change |
| 16.2. | Email Alerts for Publication of a Resource |
| 16.3. | Email Alerts for Annotation of a Resource |
| 16.4. | Configuring the Email Templates |
| 16.5. | Email Template Macros |
| 17. | Appendix 1: Metadata Template Macros |
This document is for intraLibrary administrators carrying out routine administration tasks. For support with decision-making about configuration tasks see the Configuration Guide. It is particularly important for administrators to understand the relationships between the different aspects of intraLibrary administration as indicated in the diagram below.
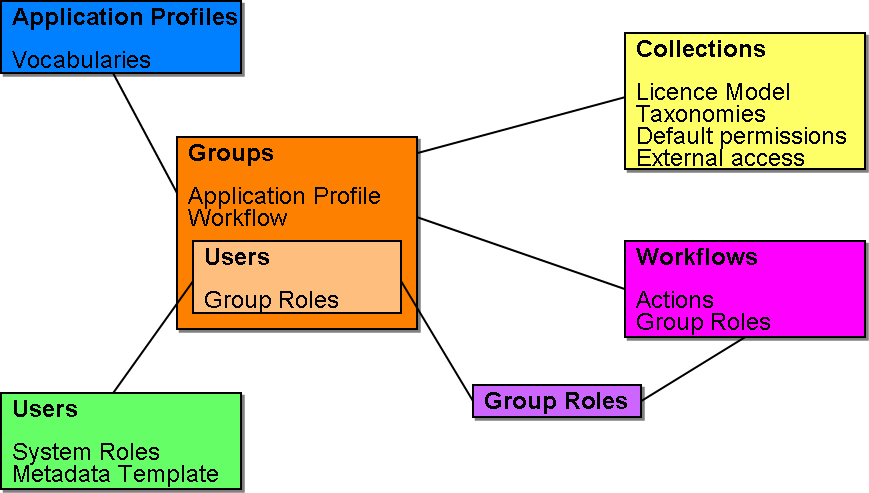
For a more detailed understanding of the relationship between these capabilities see the Configuration Guide where this diagram is discussed in detail.
One or more users may have an administration role in an installation of intraLibrary. When they log-in to intraLibrary these users see an extra admin button at the top of the screen.
When the admin button is selected an additional toolbar becomes available with the following options:
This document describes the facilities that are available in the admin toolbar, and the issues that must be considered before changing some of the settings.
The user management functions include, on the left hand side, a set of filters that can be used to search for specific users by name, system role, group, or whether or not they are logged in.
The "users" section provides facilities to add, delete and update users.
Users can be created by clikcing on the green plus sign beside Add New User at the bottom right of the screen. This will display a new window in which you can select the username, password and expiry date of the account as well as one or more system role types for this user. The standard system roles are:
It is also possible to allocate users to roles that admintsrators can configure. See System Roles for more details on how to set up customised roles.
The local licence for your intraLibrary installation constrains the number of users that can be added in the contributor, librarian and administrator roles.
All users are automatically assigneed to the default group. You only need to assign users to groups if this is not sufficient. To assign users to specific groups select the check boxes beside each user. (It is useful to use the filtering options on the right to do this.) Once the user(s) have been selected choose which groups they should be assigned to. You can select multiple groups from the drop-down menu then click on the Assign User button. A confirmation message will appear near the top of the screen.
You can modify a user's propertyies or simply view their properties,
such as their
group membership, by clicking on the edit properties icon  to the right of each user's details in the table.
This allows the administrator to modify any of the settings available when the new user was created.
An administrator can log in as any other users by clicking on the
user profile icon ![]() . This can be very useful to verify
any conditions reported by a user and see the issue from the users point
of view.
. This can be very useful to verify
any conditions reported by a user and see the issue from the users point
of view.
In the System "user options" area the administrator can choose a number of general configuration options that will affect users.
IntraLibrary comes with four standard built-in roles: Guest, Contributor, Librarian and Administrator. Each of these roles has a set of privileges available to users in that role. If these four roles do not match the privileges you would like users to have then you can create your own roles and allocate these to users. These roles are described as system roles since they apply to all aspects of the system. This also helps to avoid confusion with group roles which only apply to people within defined groups.
To create a new system role select a role type which has greater privileges than your intended new role and select only the privileges you want this new role to have.
The full set of privileges available are:
| Role type: | Adm. | Lib. | Con. | Gue. | |
| Action | Description | ||||
| Configure RSS feeds | Allows the user to generate and manage RSS feeds based on searches they have carried out. Appears to the top right in the form of a small orange icon of any results listing. | Y | Y | Y | Y |
| Move resource to workflow | Very powerful action that allows the user to move a resource into any group/workflow. Recommend that this be switched off for nearly all users. Appears on resource page in the Things you can do with this resource panel (Move). | Y | Y | Y | |
| Edit taxonomy | Allows the user to edit the classification schemes that are used in browse library. This includes being able to import ZTHES taxonomies. The edit function is available at the top of the browse interface. | Y | Y | ||
| Delete a comment | Allows the user to delete comments that other users have made against a resource. This function sits beside the individual comments found at the bottom of a resource details page. | Y | Y | ||
| Change resource collections | Same behaviour as the workflow action with the same name. You can change the collection(s) that the resource belongs to. This allows you to assign resources to any collection in the repository, so this is very powerful functionality. Use with caution! Appears on resource page in the Things you can do with this resource panel (Move). | Y | Y | ||
| View workflow status | Allows the user to see where a resource is in a workflow (if it is one). Also says whether it is reserved or not. Also says collection membership and the workflow history of the resource can also be seen. Available on the resource page in the Things you can do with this resource panel (Workflow). | Y | Y | ||
| Unreserve resources | If the user finds a resource that is reserved by another user then they can unreserved it. This can happen in two places. The first is in My Basket. The second is only available if the View Workflow Status functionality is switched on for the same user (see above); it is available in the resulting panel. | Y | Y | ||
| Find unpublished resources | Allows the user to find resources that have not yet been published. This is available in both the advanced search and browse interfaces in the form of a checkbox at the top left of the screen (below the navigation). | Y | |||
| Find resources from all collections | Allows the users to find resources in all collections, even if they do not have find access for all of them. This is available in both the advanced search and browse interfaces in the form of a checkbox at the top left of the screen (below the navigation). | Y | |||
| Delete resource | Can delete any resource that is found. Note that if a resource is reserved by another user then the resource will have to be unreserved before it can be deleted (see the Unreserve function above). The delete function is available in the Things you do with this resource panel on the resource page. | Y | |||
| Login as another user | Allows the user to login as another user (even if that account relies on external authentication). This is available in the user management interface so this also needs to be available for this to work (see configure users below) | Y | |||
| Configure users | Allows the user to access the user administration screen (found in the Admin area). Users can be added, edited or deleted here. | Y | |||
| Configure general admin | Gives access to a number of miscellaneous admin functions found under the following links under admin: System, Support and Mail. Inline help describes these sections in detail. | Y | |||
| Configure licences and usage agreements | Gives access to the legal aspects of the system found in the admin section. There are separate links for agreements and licences. Note that any licence models need to be introduced to the system through a SQL script. | Y | |||
| Configure groups | Access to group management. Add, edit and delete groups. Can assign users to groups. Can also create and assign group roles (needed for workflows) | Y | |||
| Configure collections | Access to collection management (found under admin). Add, edit and delete collections. Access between groups and collections is managed here, as well as external access to resources. | Y | |||
| Configure reports | Allows the user to generate reports based on the metadata of resources held in the repository. This page also gives some useful stats about the system. Found in the admin section. | Y | |||
| Configure metadata and vocabularies | Allows users to edit application profiles including associated vocabularies. Available in the admin section under the sub sections Metadata and Vocabularies | Y | |||
| Configure search | Allows the user to configure the various searches; simple search, advanced search and reference searches. Available in the admin section under the search sub-heading | Y | |||
| Configure system roles | Controls access to the page that allows you to configure all the actions described in this document. Always keep at least one role with this function otherwise you will be locked out of this functionality. Found in admin section. | Y |
Once you have created a new role it will be available each time you allocate a user to a role either when you first set up a new user or when you edit the properties of a role.
It is hard to separate the functions of groups from workflows as the two are tightly linked, so they will both be treated together. First the concepts of the submission workflow are described then how to configure a workflow including setting up particular groups of users with particular roles. It should be stressed that intraLibrary has a default workflow which many people will find satisfies their needs and if that is the case there is no need to read this section.
Several new terms will be introduced in this section so it is useful to start with some definitions:
A submission workflow defines the steps that a resource passes through as it is uploaded, catalogued and published into the repository. IntraLibrary has a highly configurable workflow. It enables complex, multi-role workflows to be defined, whilst still supporting the simplicity of a single-stage workflow where appropriate.
The progress of a resource through its submission to the repository is defined by the stages of the submission workflow. When a resource progresses through a workflow, stage transitions can trigger certain events, such as a change in the resource's published state and sending alerts to users with relevant workflow roles. When resources are moved in a workflow, they are moved to a particular stage, such as being sent back to a previous stage for clarification, or progressing to the next stage for classification.
Each stage of a submission workflow can have one or more workflow processes assigned to it. This means parallel processes can be defined, so users in different roles can potentially access the resource at the same stage, and do different things to it. The things that can be done to a resource are know as workflow actions. The list of available actions is given below.
Group members can be assigned one or more roles in a submission workflow. A role can be associated with one or more processes in the submission workflow. This flexible arrangement means it is possible to create a variety of different ways for people to collaborate in a submission process. It anticipates the need for users in the system to contribute to the submission of resources in more than one way, and the need for special users who have access to most or all of the workflow.
To summarise the properties of a submission workflow:
As described above, it is a property of every workflow stage, that all users who have access to that stage will receive email alerts when resources arrive in that stage (although the users can configure this themselves in their "profile"). A workflow stage can have the following additional properties.
| Property | Description |
| Change publish state | The publish state of the resource will change when the resource has passed through the stage. By default, resources are not published when they enter the first stage of a workflow, even if they were published before they entered the workflow. Setting this property at any stage, including the first stage, causes the resource to be published so it can be seen by other users. Each further use of this property toggles the published state of the resource. |
| Email addresses to alert | Emails can be sent to supplied addresses when a resource has been published. This feature is designed for sending alerts to external entities, such as mailing lists. The email addresses to be alerted can be set at the bottom of the Mail tab in the Admin section. |
| Alert message configurable by modifying the email template "stageChangeExternalUserEmail.txt". See Email Templates section for more information. | |
| Alert next stage members | Group members with a role in the next stage will be automatically alerted when the stage transition occurs. This is to allow the group members to be alerted when some action is expected. |
| Alert message configurable by modifying the email template "stageChangeObjectOwnerEmail.txt". See Email Templates section for more information | |
There is a set of predefined actions that are available to be included in any workflow process. Some actions may have completion criteria such as conformance to a subset of an application profile, or matching one of a set of licence patterns.
| Action | Workflow XSD Element | Description | Additional Parameters |
| Change collections | change_collections | Modify which collections the resource is a member of. User can put the resource in any collections they have contribute access to. | |
| Delete | delete | Remove a resource completely from the system. | |
| Edit metadata | edit_metadata | Metadata / classification editor configured by the chosen Application Profile, and an optional metadata subset. | Metadata Subset. See Metadata Subsets section. |
| Edit rights | edit_rights | Licence (rights management) editor. | |
| Export | export | Package export functions. | |
| Import from filesystem | import_from_file_system | Import a file or content package from the group's folder on the server filesystem. | |
| Link resources | link_related_objects | Link a resource to any other resource by populating the LOM Relation fields for both resources. All resources must have the correct LOM field and vocabulary assigned in the relevant application profile, and must have title and LOM identifier fields populated. | |
| Move resource | move_object | Send the resource to another stage of the workflow, with comments attached. Typically used at review stages. | Stage ID |
| Overwrite | overwrite_resource | Upload a new version of a resource to the system. New version has same metadata as old resource. The exception is if a new title has been entered at upload or imported in a content package. | |
| Preview | preview | Package/file preview. | |
| Return | return | Puts the resource back into the workflow and published state it had before it entered the current workflow. | |
| Save manifest to filesystem | save_manifest_to_file_system | Write a package manifest to a folder on the server filesystem. Folder location is a property of the workflow process. | Path of folder on server filesystem. |
| Save to filesystem | save_to_file_system | Write a content package to a folder on the server filesystem. | Path of folder on server filesystem. |
| Transfer | transfer | Move the resource into a different workflow stage or different group. User can move the resource to any group/stage they have access to. | |
| Upload | upload | Upload or add a new resource to the system. | |
| View Metadata | view_metadata | Metadata preview. |
As mentioned above, some workflow actions may have criteria that need to be met before the process can be completed. In the user interface, the process completion button will be greyed out if these criteria have not been met. The user can still click on the button, but instead of marking the process as complete, it will display details of the completion criteria that have not been satisfied.
Process completion criteria are associated with specific actions. There are currently four actions which have process completion criteria:
The process completion criteria for the "Edit Metadata" action are driven by the application profile. This can be the whole application profile, or a part of the application profile defined in a metadata subset for a workflow process. If the "Edit Metadata" action is included in a workflow process, the metadata record must meet the conditions of the application profile and any metadata subset, before the workflow process can be completed.
The conditions that can be imposed by an application profile include:
The process completion criteria for the "Edit Licence" action are driven by the licence model. If the "Edit Licence" action is included in a workflow process, the licence information must match one of the licence patterns in the licence model before the workflow process can be completed.
The conditions that can be imposed by a licence pattern include:
The "Save Package to Filesystem" and "Save Manifest to Filesystem" actions both have only one process completion criterion. The user must have performed the action before the process can be completed. In technical terms, these two actions have a "state", i.e. the system remembers whether or not the user has performed that action.
If a workflow stage has more than one process defined, and more than one of these processes has completion criteria, then all of the completion criteria for all processes in a stage must be met before a resource in that workflow can be moved to the next stage.
The built-in workflow editor is the most convenient way to create and edit workflows. (It is also possible, though not recommended, to create workflows as XML files and import them. Please contact Intrallect for further information on the workflow XSD.)
In the Workflows section of the Admin tools all available workflows are listed in a panel on the left. The list below is an example but the actual list of workflows will vary depending on which workflows have already been created.
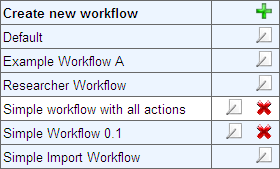
When a workflow is in use, that is, it is assigned to a group,
it cannot be modified or deleted.
In this case the properties icon will show details of the workflow but these details
cannot be modified.
When a workflow is not in use it can be edited or deleted. In this case the workflow will also show a red cross. Clicking in the properties icon for these workflows will open them in an editable mode.
You can create a new workflow by clicking on the green cross at the top right of the workflows list.
This section presents a step by step guide to creating a new workflow strating from when you click on the green cross.
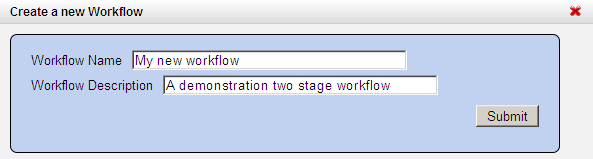
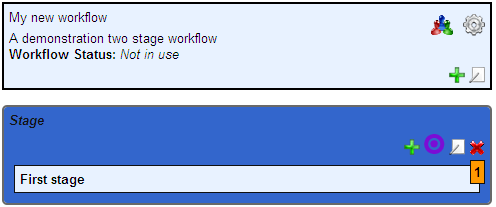
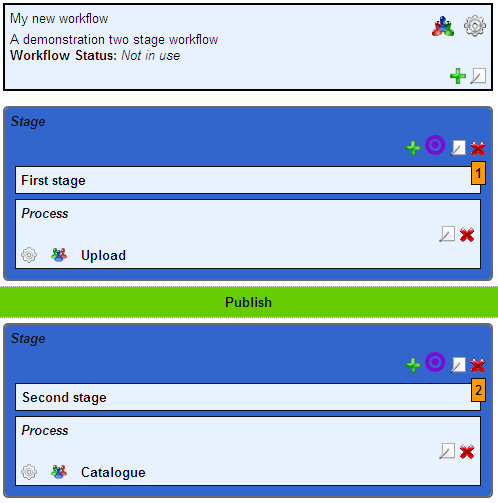
First you need to choose a name and description for the workflow. Then click on Submit. You will then see the heading for your new workflow as shown below:

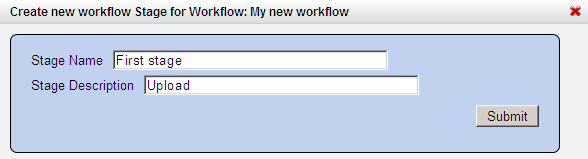
Now, to create the first stage of your workflow, click on the green cross and provide a name and description for this stage. Then click Submit.
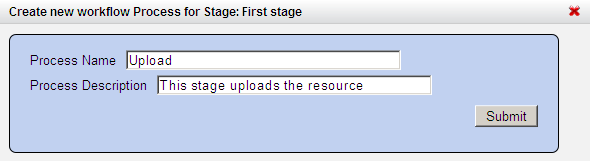
Now you will see that your workflow has the first stage included. Click on the green cross in this stage area to add a process to this stage.
A process is the part of the workflow that contains a set of actions and the roles that can carry out those actions. Give this process a name and description and then click Submit.
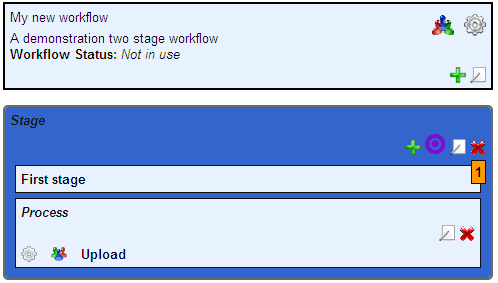
Now the workflow has a single stage containing a single process. Before you move on please repeat these steps to add a second stage containing a single process.
In this example we want to Publish the resource when the first stage has been completed and before the second stage starts. To toggle the publication stage click on the target icon indicated below. Note that there are two of these icons and you need to click on the one in the first stage.
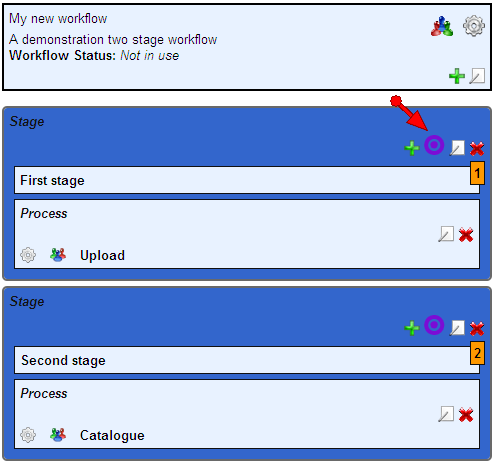
Now the workflow shows that the resource will be published after the first stage of the workflow.
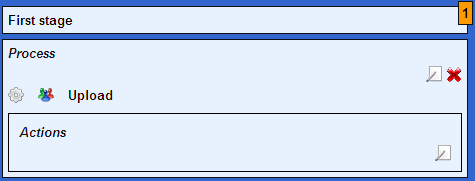
The next step is to add some actions to the process in the first stage. Click on the cog wheel at the left in the process box of the first stage. An Actions box will appear with a small edit properties icon inside on the right. Click on this icon.
Now you can select the actions that you want to permit in this process. To select several options at once see the tips at the bottom of the panel.
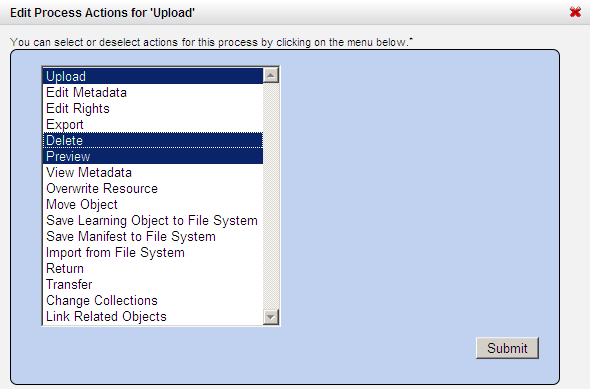
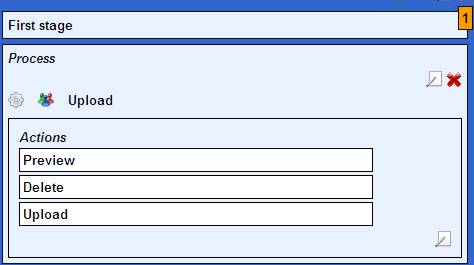
All of your selected actions will be available to users in the appropriate role in this process of the workflow.
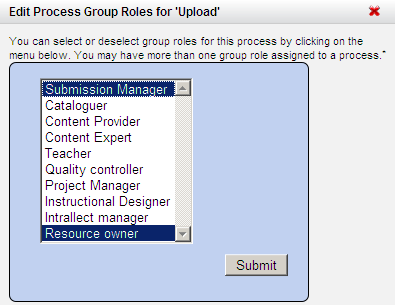
Now, to define which roles will be able to play a part in this process, click on the people icon in the process box. This will open a Group Roles box. Click on the edit properties icon at the bootom right of this box to add Group Roles.
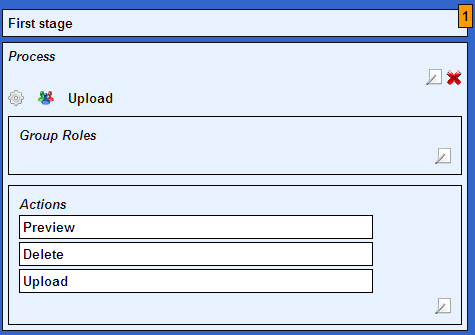
In the pop-up box select the roles you want to have access to this process of the workflow. If the roles do not already exist you will need to leave workflow editing and add the new Group Roles. You can leave workflow editing at any time and your edits will be preserved when you return. See Group Roles for information on creating Group Roles.
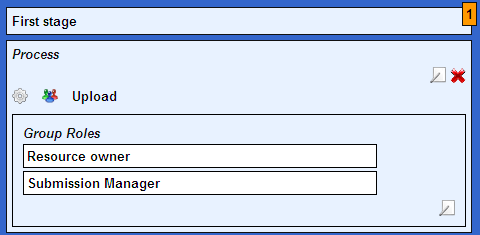
Now the group roles you have selected will be displayed in the workflow. You can view the group roles and actions in any process at any time in the workflow section by clicking on the people or cog wheel icons respectively.
You now know how to do everything in the workflow editor and can proceed to create the group roles and actions in the process in the second stage by yourself.
Note that the workflow you have been editing has not yet been assigned to a group so is not yet active. While it remains inactive it is editable but once it is assigned to a group you will still be able to view it but not modify it. To further modify it you need to unassign it from use in all groups.
Intrallect can create workflows to customer's requirements, or you can define your own workflows and create them in intraLibrary. The following workflows are given as examples of what is possible. Each defines one or more processes, related actions and the published state (published/unpublished) in a workflow with one or more stages.
| Stages | Stage1: Contribute |
| Processes | Process 1: Upload and Catalogue
|
| Publish State | Unpublished |
| Stages | Stage1: Contribute | Stage2: Catalogue | Stage3: Review |
| Processes | Process 1: Upload
|
Process 1: Catalogue
|
Process 1: Check
|
| Publish State | Unpublished | Unpublished | Published |
| Stages | Stage1: Contribute | Stage2: Clear Rights | Stage3: Catalogue | Stage4: Classify |
| Processes | Process 1: Upload
|
Process 1: Rights
|
Process 1: Transcription
|
Process 1: Classify
|
| Publish State | Unpublished | Published | Published | Published |
| Stages | Stage1: Create Placeholder | Stage2: Add Content | Stage3: Review Content |
| Processes | Process 1: Upload
|
Process 1: Upload
|
Process 1: Check
|
| Publish State | Unpublished | Unpublished | Published |
Users must reserve a resource before they can work on it. This can happen in one of three ways:
Once they have reserved the resource, it appears in their reserved area and the actions in the relevant workflow processes become available. On the resource page a button is shown for each of the actions in each process, as well as a button to click when the process has been completed.
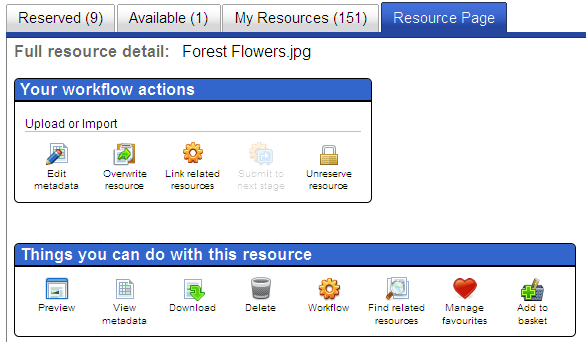
In the reserved area the user can work on the resource in various ways: edit metadata, manage licensing etc. When they have completed their work, and met any criteria on the metadata, they click the button to declare the process as completed.
When all the processes at that stage are marked as completed, the resource will be moved on to the next stage. Users who have access to the resource at the next stage will receive an email alerting them that there is a new resource to work on, unless they have changed their user profile to not receive group alerts.
A workflow can be added to intraLibrary by a user who has administrator access to the repository. (It is also possible create and upload your workflow in an XML document which conforms to the XML Schema for submission workflows, which is publicly available at http://www.intrallect.com/xsd/intralibrary_workflow_v0p5.xsd). See the intraLibrary Configuration Guide for more details on how to configure a workflow.
An administrator can remove a contributor from the system. If there are resources which the contributor is working on, the administrator will have the option to have the resource's ownership information removed.
Administrators can also remove whole groups from the system. If the group is currently working on resources then the administrator will have the option to transfer the resources to another group.
There may be one or more workflows available in the system. After creating a group of users, an administrator can assign one of the available workflows to the group. This group of users shares an instance of the workflow. Other groups can share their own instances of the same workflow.
Users get access to processes within a workflow by being assigned workflow roles within the group. To give roles access to workflow processes, the administrator must add the roles assigned to the process in the workflow editor. The administrator assigns users to one or more workflow roles in the context of a particular group. Users who are members of more than one group can be given different roles in each group.
It's also possible to ensure all users in a group have access to their own resources when those resources are in a particular workflow process. The process must include the element ownerAccess within the workflow. The intraLibrary default workflow, for instance, only has one stage for upload and cataloguing, and has ownerAccess (and no group roles) assigned, so that all users can upload their own resources, catalogue, and publish them.
New Group Roles can be added in the Groups section of the Admin pages. Click on the Group Roles tab and use the green cross to add a new role by supplying a name and description for the new role. This role will then be available for use in worklows.
To participate in a submission workflow, users must have contributor status. Normal users do not have a Work Area.
Resources belong to one group only, and are therefore part of only one submission workflow. Resources exist at a single stage in the instance of the workflow belonging to that group. Group members assigned a role in a submission workflow may have access to one or more stages of the workflow.
Users share an "available" area for each stage of the group's workflow. All users in the relevant roles will be alerted when a resource is moved into the relevant "available" area. Any user in the relevant roles can then choose to select this resource to work on (see below).
To allow a contributor user to add a resource to a particular collection, the administrator must give the group "contribute" permission to the collection. A resource must be in at least one collection and can be in many different collections.
Each contributor user has a work area where they participate in the submission workflow. The work area is divided into two parts: Reserved and Available. When the user has group role access to a workflow stage that includes the action "upload", they will have an upload button available. Likewise, if they have access to a workflow stage that includes the action "import from filesystem", they will also have an import button. If they do not have group access-permission to contribute to any collection, neither the upload nor import button will appear in their work area.
In the available section users can see all the resources they potentially have access to. Each resource has a listing that includes title and description, and access to basic functions such as preview. Users can select the resources they want to reserve so that they can work on them.
In the reserved section you see all the resources you have chosen to work on. In addition to the basic information and functions, each workflow process that is available for the resource is accessible through clicking on the workflow actions on the resource page.
In both the available and reserved areas, the list of resources displayed can be constrained by various criteria. Users can apply filters to select resources in a particular group and a particular stage of a workflow. Saved searches can be used to search the list of resources by specific properties.
The upload page, which appears when the user clicks the upload button, is where a user can contribute a resource (file, pages, URL, content package, etc.) to the system. Users only see this section if they have access to a workflow process that includes the "upload" action. Users can choose at the upload stage whether or not to automatically reserve resources they contribute. Users who are members of several groups can choose which group they are contributing the resource to. If the group has access to more than one collection then they can choose which collections to put the resource into. They can also upload any number of resources at once by clicking the '+' sign in the upload form.
The import section is provided to enable users to import large files from the server filesystem. Import also allows users to upload a number of resources at once. Users only see this section if they have access to a workflow process that includes the "import from filesystem" action. When users import resources, they can choose whether or not to automatically reserve those resources. Users who are members of several groups can choose which group they are contributing the resources to. If the group has access to more than one collection then they can choose which collections to put the resources into.
There are a number of properties which can be set for a collection:
One or more classification systems (taxonomies) can be used for each collection. This enables shared classification systems to be used for some or all resources in the repository, or separate classifications to be used for each collection.
The classification systems used for collections affect what users see in their Browse Library interface, and contributing users see in their Classification interface. For example, if collection A uses classification system A and collection B uses classification systems B and C then:-
Collections in intraLibrary can use different metadata application profiles and licence models from each other. Many customers may have no need for this feature, so it is important to point out that many installations of intraLibrary will only ever use one metadata application profile and one licence model (if any). If this is the case, then there only ever needs to be one "active" application profile and licence model, and these will be applied to all collections by default.
However, some customers will need to manage collections of resources which have different metadata properties, or are licensed under different sets of conditions. In this case the submission workflow will apply the application profile and the licence model appropriate to the collection the resource is in. It should be noted that:
To manage collections, click on the "Collections" link in the "Admin Tools" navigation bar. This will open the "Collections Management" area. In this area an administrator user can change the properties of existing collections, add new collections to a system, and remove collections which have no resources in them.
In new installations of intraLibrary, and installations that have been migrated from previous versions of the software, there will be a single collection called "default collection". You can rename and change any other property of this collection by clicking the "Edit Properties" link for this collection.
To add a new collection, click the "Add Collection" button at the top of the Collections Management area. You will be taken to a form to fill in all the properties of the new collection.
For information about changing which collections a resource is in, please see the Librarian's Guide.
Managing of access to collections is defined through the collections' relationships to groups of users. Every group has a relationship with every collection. For each group-collection relationship, the permission which the group members have when working with resources in a collection are defined.
To make it easier to manage the relationship between large numbers of collections and groups of users, each collection has a default set of access permissions. Groups who have not had specific access-permissions assigned to them for a particular collection get the default access permissions. Therefore the default access permissions for a collection are generally the lowest common denominator of access an administrator wants to allow.
There are five permissions associated with each group-collection relationship, and they are described below. The administrator can choose any combination of them. For example the administrator could allow members of group A to be able to find and preview resources in collection B without allowing them to export and contribute resources. The permissions are:-
Please note: For simple resources, such as single documents or media files, the distinction between "preview" and "export" has little meaning, since it is necessary to download the file to be able to preview it. The distinction only has meaning for more complex resources, such as content packages, where it would more difficult, although not impossible, for a user to download every file connected with a resource and reassemble it.
For a user to contribute a resource to a collection they must:
The ability of external systems to search an intraLibrary repository is configurable for each collection within the repository. Two approaches are currently supported:
A simple example of relating groups to collections is shown in the diagram below. In this case User X is in group A and User Y is in groups B and C. Group A has full access permissions (i.e. find, preview, export, comment and contribute) to collection A but no access permissions to Collections B and C. Similarly group B has full access permissions to Collection B but no access permissions to Collections A and C.

As a practical example consider the process involved in creating a collection (Collection A) and giving full access to it for members of group A and no access to it for members of group B and group C. Assuming that groups A, B and C already exist, you would need to perform the following steps:-
When contributing a resource to intraLibrary, there is an order of precedence which determines which application profile and license model is applied to a resource. This is only an issue in installations when more than one application profile or license model is being used.
The general order of precedence is collections, groups, default settings. This means that if features are defined at the level of collection then they will be used. If they are not defined at collection level then the ones at group level will be used and if they are not defined at group level then the default settings will be used. For example:-
There are several options for configuring the use and behaviour of metadata and vocabularies within intraLibrary. The most important is the "application profile", which is used to control which metadata fields are in use in a particular context, and the rules for applying these metadata fields. It is also possible to modify the metadata vocabularies available within the system. Subsets of the available metadata fields can be created to define which fields contributors and cataloguers see in a workflow.
The administrator's choice of application profile affects which metadata fields are exposed to users, and what rules are applied to these metadata fields. Typically, an organisation or project will have well defined rules for how metadata should be used, and these are expressed using application profiles. They may well base their application profile on a published application profile, such as those given below.
Application profiles can be used to combine fields from more than one metadata model. The IEEE LOM model is included by default. If any other models have been added to the system, fields from these models will also be available for editing in the application profile editor. If you need to add additional metadata models to the system, you can do so by adding a new application profile or copying then editing an existing one in the "metadata" section of the "admin" menu. More information about defining metadata models is provided in the Configuration Guide for intraLibrary.
One or more application profiles can be active, which means they can be applied to collections or user groups. See the section on precedence issues for more information about how these two uses of application profiles are related. This enables an organisation to use different application profiles for different kinds of resources or services, whilst managing them all in a single repository system.
The application profile controls several aspects of each metadata field, including cardinality, optionality, visibility, editablity and vocabulary.
IntraLibrary comes with three pre-configured application profiles:
An administrator can also add, copy, delete and edit application profiles inline. If an application profile is to be based on one of the existing ones listed above, or another pre-defined application profile, it makes sense to use "copy" to avoid having to create your new application profile from scratch. When you click "add an application profile", the properties of fields in the new application profile are populated from the defaults that intraLibrary uses.
Intrallect can help you define an application profile that meets the specific needs of your project or service. Please contact Intrallect (support@intrallect.com) for more information.
IntraLibrary includes the ability to edit an application profile inline. To do this, click the edit link of the relevant application profile in the listing. Editing an application profile should only be undertaken by someone who knows what they want to achieve with an application profile and who is familiar with the IEEE LOM metadata model.
One simple property of an application profile that can be changed easily is the default optionality of an application profile. This affects the list of metadata fields that appears by default in the metadata editor. The default is to show only the mandatory fields. If for example it was desired to show contributing users all the mandatory and recommended fields by default, the default optionality should be changed to recommended. It is also possible to change the names of the levels of optionality, e.g. you can set "mandatory" to appear in the Metadata Editor as "fields that must be filled in", etc.
The following properties of an individual field can be modified:
The administrator can manage the vocabularies used in the metadata by going to the "vocabularies" section of the "admin" tools. It is possible to create, edit and delete vocabularies. Vocabularies can be modified in various ways including:
The system will prevent you from deleting a vocabulary that is currently being applied in an application profile. It will not stop you from modifying any vocabulary, so it is important to be aware of which vocabularies are being used in the system, and how any changes will affect users.
Changes to the vocabularies affect what terms users will see in the drop-down list for each vocabulary. These drop-down lists are used in the metadata editor, and the advanced search interface. If you edit a vocabulary term (token) itself, metadata records which include the original term will not be affected. If you change the label for a vocabulary term, this change will be visible everywhere the term is used.
It is possible to control what metadata fields users in different group roles can see and edit within different processes of a workflow, e.g. you may wish those uploading resources to only see and fill in the title, description and keywords for a resource, with cataloguers filling in the rest of the metadata at the next stage. You may also wish the cataloguers to be able to see the automatically generated identifier for a resource, but not be able to edit it. An administrator can manage this by configuring metadata subsets in the "metadata" section of the "admin" tools. Metadata subsets configured there are associated with workflows by their name, so it is important that the name of the subset be exactly the same as the subset name in the associated workflow. You must configure any subsets associated with a workflow before you upload the workflow to the repository in the "workflows" section of the "admin" tools. However, it is possible to edit a subset once both subset and workflow are active in the repository.
This interface allows you to configure the following aspects of the search features in intraLibrary.
You can use this interface to change the search configuration. If you do change these settings, you must re-index the metadata before they will take effect.
By default intraLibrary is configured to use all the main free-text metadata fields in a simple search. Those metadata fields with fixed vocabularies are excluded from this index because they might skew the search towards words that are used as tokens in the vocabularies.
The default drop-down list of metadata fields in the advanced search interface includes the metadata fields that are commonly considered useful. However, you may wish your users to have access to searching other metadata fields. This interface allows you to configure which metadata fields appear in the drop-down list.
Note that it is possible to create new system roles with Configure search permissions. Roles with this permission set will be able to set their own search advanced search criteria which will apply to their specific role.
Values stored in specified metadata fields can appear as links in the view metadata page. A user can click these links to see a list of resources which have that same value in their own metadata. A good example of where this is useful is when one resource makes a reference to another resource, using the "relation" fields from the IEEE LOM metadata. The user can click on the link to the reference and see the resource the metadata refers to.
Making a metadata field available for "reference search" means a search link will be displayed for every instance of that field that appears in the view metadata page. End users can then click that search link to carry out a reference search when viewing metadata for a resource. Reference search is carried out as a "simple search" of the term in the link being clicked on, which means the search runs against all the fields specified for "simple search", not just for that specific metadata field. So you must ensure that the correct fields are configured for simple search for your users.
If you select On file content for simple or advanced search then the search index will include text within certain file types. These file types are:
You can configure the search index to include terms in the classification system. This should normally be done with great caution as common terms in classifications will result in large numbers of search results with little discrimination. It is most commonly useful when a classification system has extensive notes or "use for" terms as these are also included in the search index. For this reason classification searches can be switched on or off on a taxonomy by taxonomy basis.
IntraLibrary includes the ability for users to save search criteria from the Advanced Search page. Administrators of the system have an additional power to create public saved searches, for use by other users.
Public saved searches commonly define the sort of search constraint that users might want to deploy as their default saved search. Users will see a list of public saved searches in the relevant drop-down list in their user preferences page. They can select a default saved search to constrain the results of all of their search and browse operations.
Contributor users can use public saved searches or their own personal saved searches to search the contents of their work area.
NB: Public saved searches are not currently exposed to other users in the advanced search interface itself.
The organisation running intraLibrary may wish to use the usage agreement feature of intraLibrary to record users' acceptance of a general agreement to use the system. This agreement may encompass the legal agreements that are defined for the community licences described in the next section or it may simply be a code of conduct. The text of a usage agreement can be entered into the system by the administrator. On first or every login, the user can be presented with this agreement to accept or reject. Details of the acceptance of an agreement are recorded in the database, and users can see what agreements they have accepted at any time in their profile.
A common barrier to the reuse of resources is the issue of ownership and copyright. Conflicting copyright agreements, or uncertainty over ownership and usage permissions, is a constant thorn in the side of those who want to share resources within or between organisations.
Intrallect has included a community licensing solution in intraLibrary to help overcome some of these barriers. This solution enables resources to be deposited in intraLibrary under one or more community licences. These licences define the conditions under which the resource is made available to other users. One example of such a set of licences is Creative Commons.
It is also common to want to have some kind of usage agreement for a repository. Some users will be depositing resources, others will be exporting and reusing resources. Organisations will often want these users to acknowledge that certain conditions apply to their use of the repository. IntraLibrary administrators can define usage agreements for the various roles in the system, which users must accept before they get access to the relevant functions.
An organisation can define its own licensing model to be used in their intraLibrary repository. The licensing model consists of a set of one or more community licences. Each licence can have a different combination of the various parameters available in the Intrallect Licensing Information Model (ILIM), which is based on the Open Digital Rights Language (ODRL). These licences define the conditions under which the resource is made available to other users.
The licences can include permission, requirement and constraint parameters such as:
There is also a transfer permission, which specifies how strictly the above conditions are applied if the resource is passed on to other users. This allows licence conditions of the sharealike type, as used by Creative Commons, to be expressed.
A licence editor action can be included in any process of a submission workflow for an intraLibrary repository. This gives the user an opportunity to select the licence under which they make their resource available. The completion criteria of the workflow process may define a subset of licences to which the resource must conform.
The licence editor enables the user to make a choice between the available licence templates. Each licence may be presented as a row of icons or phrases with an associated radio button. The user clicks the radio button next to their chosen licence. They are then shown other fields that may need to be populated for that instance of the licence, such as the identity of the copyright holder(s). When the user has saved all the necessary information, the licence action has been completed.
When the community licensing system is activated, the licence properties of resources are visible to users when searching and browsing. When a user sees a list of resources, the type of licence will be indicated to them using a set of symbols or phrases, or alternatively, a single Terms and Conditions of Use link may be shown directing them to an external web page. The symbols or phrases represent a particular permission or constraints on the user of the resource, which may differ between the available licences. Each symbol or phrase can be a link to a description of the relevant constraint, or the relevant part of the full text of a licence agreement.
It is possible to associate different licensing systems with different collections in intraLibrary.
For an organisation to apply their own set of licences in intraLibrary, they will need to do several things.
The community licensing solution in intraLibrary does not:
The licence information needs to be stored in the repository, and potentially be portable between repositories and other systems. IntraLibrary uses the following approaches to storage and exchange of licence info:
The system section has six tabbed sub-sections:
The following settings can be configured for users:
The following metadata settings can be configured:
The following RSS newsfeed settings can be configured:
The following general system settings can be configured:
This page is automatically generated from the intraLibrary, Java, operating system and MySQL data on the server. When reporting any problems to support@intrallect.com it is extremely useful to copy this page and include it in the description.
A URL to an openSearch style sheet can be included here. If included, this XSL style sheet will be applied when searches are carried out using openSearch - the search mode used by web browsers such as Internet Explorer and Firefox. The default style sheet can be found at application URL/opensearch/sru_style.xsl
If you have a problem or bug in your installation of intraLibrary, it may occasionally be necessary for a member of Intrallect's support team to get access to your repository. You can allow this by switching on "support access".
Enabling support access will create a temporary user with admin rights and send the login details to the Intrallect support team. This will grant the Intrallect support team temporary access to the application in order to diagnose the problem. The support user will persist until the support access is disabled.
In order for support access to work, the application must have enough capacity in its software licence to allow the addition of a new (temporary) user with contributor, librarian and administrator permissions.
In normal operation, the support section of the "Admin Tools" will include the message "support access is currently disabled", and link to "Enable External Support Access". If you have been asked by a member of the Intrallect support team to activate support access in your installation of intraLibrary, click the link to "Enable External Support Access".
If you do not have enough capacity on your software licence, the page will display the message "it was not possible to enable support access as there was not enough capacity on your licence." If this happens, you need to take away contributor privileges from one of your existing users before you can enable support access.
When support access is active, the support section of the "Admin Tools" will display information about the status and identity of the support user, and a link to "Disable External Support Access".
If you click "Disable External Support Access", then the support login will be de-activated. Re-activating support access again will create a completely new login for the Intrallect support team.
When the intraLibrary system sends out emails, it uses the Simple Mail Transfer Protocol (SMTP). To do this, it must be able to connect to an SMTP server. An SMTP server accepts emails from sources it recognises, and relays the emails towards their destination via a chain of similar SMTP servers.
The SMTP server you use may be on your local network, or available on the internet. A non-local SMTP server will normally require a username and password before relaying emails.
The following settings are required for a non-authenticated SMTP server:
The values you enter in these fields may well be the same as the configuration of your outgoing mail server in your normal mail client, e.g. Mozilla Thunderbird or Microsoft Outlook.
It can sometimes be difficult to be sure if you've got the SMTP settings right. The system can send out a test email to help you check everything is working.
To check the email connection is working:
If you don't receive an email, first check your spam or junk folders to see if it ended up there. If not, then you need to go back and review your SMTP settings.
In the "reports" section of the "admin" tab, you can generate metadata reports in Excel or CSV format. These metadata reports list the values contained in selected metadata fields. Report configurations can be stored and reused as templates.
The following variables may be configured for reports by filling in the "Generate Metadata Reports" form:
To create a report:
To save a report configuration as a template:
The metadata reports page also displays a range of basic statistics about your local intraLibrary installation, including the total number of resources; the number of published and unpublished resources; the total number of users; the number of users in each role (i.e. guest, contributor, librarian and administrator); the number of groups and collections; and the number of users currently logged in ("Current user sessions").
This tab also gives you the version and build number of intraLibrary currently being used for your installation.
IntraLibrary uses a memory cache of resources to improve performance and reduce the load on the underlying database. The maximum number of resources stored in the cache is configurable. A larger number will generally improve performance if sufficient memory is available on the server. See the installation notes for more details.
Occasionally a resource may get corrupted in the cache. For example,
all its metadata might appear to
have been lost. If this happens, the cache can be rebuilt from
the resource data stored in the database by
clicking the rebuild resource cache button. 
If a search in intraLibrary seems to be producing strange results, or is missing resources you think it should be finding, the first course of action should be to re-index the metadata. It's also important to do this if the search configuration is modified.
Re-indexing rebuilds the index the search engine uses to find resources that are relevant to a given query. Depending on the number of resources in the system, re-indexing could take a few seconds, a few minutes, or much longer. Re-indexing updates one metadata record at a time, so there is no major problem in re-indexing whilst users might be searching for resources.
If your installation is configured to support thumbnailing of image resources, you will see a button to "rebuild image thumbnails". Thumbnails will be created for all single (JPEG) images when they are uploaded into the repository. See the installation guide for more information and configuring the repository to support thumbnailing.
Occasionally it may be necessary to rebuild thumbnails for all the image resources. You might need to do this for the following reasons:
If you need to rebuild thumbnails for any reason, click the "rebuild image thumbnails" button. Rebuilding the thumbnails for a large number of image resources can take a while. Whilst thumbnails are being rebuilt, the "rebuild image thumbnails" button will be greyed out every time you visit the "system" page.
A message below the "rebuild image thumbnails" link tells you what the current thumbnails settings are. For example it might say:
If you have made changes or additions to the metadata templates, you will need to use the Reload templates link to reload the templates before your changes take effect.
To save the user having to repetitively enter easily definable metadata values, intraLibrary can optionally populate metadata records with pre-defined values. These pre-defined, or default, values are defined in stored templates which must themselves be valid IMS Metadata records in XML format. In these metadata templates any metadata field can be assigned a default value, or multiple default values where appropriate.
Metadata templates are defined using XML files which follow the IMS Learning Resource Metadata XML Schema. These files must be placed in the config directory of your intraLibrary installation, inside a folder called metadataTemplates. An easy way to create a metadata template is to create a dummy resource in intraLibrary with the metadata properties you want. You can then export an IMS Learning Resource Metadata record from this resource, and use the resulting XML file as the basis for your new metadata template. The filename of the metadata template must be of the form templatename.xml.
When you have added or updated templates in the metadataTemplates folder, you need to click Reload Templates in the system section of the intraLibrary admin tools to update the templates used inside intraLibrary. Templates will appear in the relevant drop-down list in the user preferences page. The name of each template will be the name of the file with the .xml suffix removed. There is a template called default that is supplied with the system. You can overwrite this by creating your own default.xml template in the metadataTemplates folder. Templates are also made available to users in the Metadata Editor in their work area, so that they can be applied while editing metadata.
The system can also be configured to apply metadata templates to records exposed to external systems via service interfaces. You may wish, for example, to ensure that a particular copyright statement appears in metadata records harvested via an OAI-PMH service, or that a particular field is populated with a Public URL when using SRU to query your repository from your website. More information about these interfaces can be found in the intraLibrary Integration Guide.
The following options are available in the Metadata Options section of the system page:
Metadata templates are defined in XML files which follow the IMS Learning Resource Metadata XML Schema. Any property of the IMS/IEEE LOM metadata model can be defined in a metadata template. The metadata fields in a template can be populated either by static strings, or dynamic macros generated using information available to intraLibrary.
Metadata template macros can be called up using the macro name in curly brackets, such as {UserFullName}. A complete list of metadata template macros is given in Appendix 1: Metadata Template Macros. Metadata template macros cannot currently be called up as part of another string, so including The user who wrote this is {UserFullName} in the copyright.description field won't work.
The following example shows how you can mix static strings and metadata template macros in the lifecycle section of a template defined IMS Learning Resource Metadata (XML) format:
          <lifecycle>
          <contribute>
          <role>
          <source>
        <langstring xml:lang="x-none">LOMv1.0</langstring>
          </source>
          <value>
        <langstring xml:lang="x-none">Author</langstring>
          </value>
          </role>
          <centity>
        <vcard>{UserVCard}</vcard>
          </centity>
          <date>
        <datetime>{NowCurrentDate}</datetime>
          </date>
          </contribute>
        </lifecycle>
You can use an XML Editor to compose and validate your metadata template. Using some of the metadata template macros in particular fields may cause a validation error, but this does not necessarily mean your template will not work in intraLibrary. For example, using the {ObjectFileSize} macro in the technical.size field of the metadata will cause a validation error, because the XML Schema requires this element to contain a number. Therefore, if you are using a validating editor such as XML Spy, it is probably best to insert the metadata template macro after you have finalised and validated the overall structure of your template.
The administrator can choose to send an alert to all administrators and/or all librarians when a resource has been commented on or tagged by a user. This is done through the "Ser Options" section of the "admin tools page". The text for this alert can be altered by changing the "annotationNotificationEmail.txt" or "tagNotificationEmail.txt" which are stored in the email templates sub-directory in the configuration directory.
Users can also select in the "preferences" page of their "profile" to receive an email when anyone tags or comments on their resources. The email templates for these are also in the email templates sub-directory and are "objectOwnerAnnotationNotificationEmail.txt" and "objectOwnerTagNotificationEmail.txt".
In the above section different types of email notifications were considered. The text for these email notifications can be modified by the administrator by altering the templates which are contained in the email templates directory on the configuration directory on the server in which intraLibrary is installed. The example below shows a sample template for an email about a resource changing state (stageChangeEmail.txt). There is a list of the macros which can be used for each template in the section on Email Template Macros.
          A new learning object is now available.

          Click on the link below to preview the resource:
          __url__

          title:
          __title__
          description:
          __description__
          comment:
          __comment__
          classifications:
          __classifications__

          This message was sent to you by the administrator of intraLibrary.
The following macros can be used by all the email templates (StageChangeEmail.txt, StageChangeExternalEmail.txt, StageChangeObjectOwnerEmail.txt, UserPublishNotificationEmail.txt, adminPublishNotification.txt, annotationNotificationEmail.txt)
| Variable | Description |
| __repositoryName__ | Name of the repository which the resource is stored in |
| __url__ | The public URL of the resource |
| __title__ | Name of the repository which the resource is stored in |
| __description__ | The description of the resource (from metadata field "description") |
| __currentStage__ | The stage which the resource is currently in |
| __currentWorkflow__ | The workflow which the resource is currently in |
| __classifications__ | List of all taxonpaths which the resource is classified under |
The following variables are available for use in each email template except the annotation notification email (i.e StageChangeEmail.txt, StageChangeExternalEmail.txt, StageChangeObjectOwnerEmail.txt, UserPublishNotificationEmail.txt, adminPublishNotification.txt, )
| Variable | Description |
| __publisher__ | Name of the person publishing or moving the resource |
| __comment__ | Comment made when moving the resource |
The following variables are available only on the annotation notification email (annotationNotificationEmail.txt)
| Variable | Description |
| __annotation_text__ | The text body of the annotation (comment) which has been written by the user |
| __star_rating__ | Star rating |
| __tagstrings__ | Tags |
| __annotation_date__ | Date of the annotation |
| __Username__ | The name of the user who created the annotation |
The macros available for populating metadata templates are:
| Property | Description | Possible Uses (target metadata fields) | |
| Properties of the user | |||
| {UserFullName} | User Account | The full name of the user, as stored in the user profile | |
| {UserAffiliation} | The affiliation (employer, institution or project) of the user, as stored in the user profile | ||
| {UserEmail} | The email address of the user, as stored in the user profile | ||
| {UserPreferredLanguage} | The language the user has chosen as their preferred language in their user profile | general.language metametadata.language educational.language |
|
| {UserUsername} | The intraLibrary username of the user | ||
| {UserVCard} | Returns the user's stored details in vcard format | lifecycle.contribute.centity metametadata.contribute.centity annotation.centity |
|
| Properties related to the current date / time | |||
| {NowCurrentDate} | Current date in UTC format | lifecycle.contribute.datetime metametadata.contribute.datetime annotation.datetime |
|
| {NowGuid} | A globally unique identifier (GUID) generated using the current time | ||
| Properties of the resource | |||
| {ObjectMimeType} | Mime type of resource matched by file extension | technical.format | |
| {ObjectPublicURL} | Full Public URL for this resource for this user | technical.location | |
| {ObjectFileSize} | Size in bytes of uploaded file or package .zip file | technical.size | |
| {ObjectAggregationLevel} | Not currently supported Placeholder for an automatically generated value of 1-4 depending on predefined rules for assessing the complexity or granularity of a resource |
||
| {ObjectCreationDate} | Date of creation, extracted from metadata in digital file. Currently supported for JPEG images (exif:DateTimeOriginal) only | lifecycle.contribute.date | |
| {ObjectCreator} | Author/creator of digital resource, extracted from metadata in digital file. Currently supported for JPEG images (tiff:Artist) only | lifecycle.contribute.centity | |
| {ObjectFilename} | Returns filename of uploaded single file, or filename of package .zip file | general.title | |
| {ObjectId} | The OAI identifier of the resource | general.catalogentry.entry | |
| {ObjectLocalID} | The number of the resource in the repository | general.catalogentry.entry | |
| {ObjectPublicManifestURL} | A Public URL allowing download of the resource's content package manifest, for this user | ||
| {ObjectPublicURLAsZIP} | A Public URL allowing download of the resource as a .zip file IMS Content Package, for this user | ||
| Properties of the repository | |||
| {RepositoryName} | The name given to the intraLibrary repository in the properties file | ||
| {RepositoryId} | OAI identifier of the intraLibrary repository assigned in the properties file | ||
| {RepositoryAdminEmail} | Email address of the repository administrator | ||
| Properties of application profiles | |||
| {ApplicationProfileName} | The recognised name of the application profile, e.g. "CanCore" | metametadata.metadatascheme | |
| {ApplicationProfileSource} | The authoritative source for the application profile | ||
| {ApplicationProfileVersion} | Version number of the application profile | ||
| Properties of JPEG images (extracted from EXIF metadata) | |||
| {ImageCompressionScheme} | tiff:Compression | Z39.87: Compression.CompressionScheme | |
| {ImageCompressionRatio} | exif:CompressedBitsPerPixel | Z39.87: Compression.CompressionLevel | |
| {ImagePixelWidth} | exif:PixelXDimension | Z39.87: ImageWidth | |
| {ImagePixelHeight} | exif:PixelYDimension | Z39.87: ImageLength | |
| {ImageCameraMake} | tiff:Make | Z39.87: DigitalCameraManufacturer | |
| {ImageCameraModel} | tiff:Model | Z39.87: DigitalCameraModel | |
| {ImageOrientation} | tiff:Orientation | Z39.87: Orientation | |
| {ObjectCreationDate} | Date of creation, extracted from metadata in digital file. Currently supported for JPEG images (exif:DateTimeOriginal) only | lifecycle.contribute.date | |
| {ObjectCreator} | Author/creator of digital resource, extracted from metadata in digital file. Currently supported for JPEG images (tiff:Artist) only | lifecycle.contribute.centity | |