| Intrallect intraLibrary 3.3: Getting Started - Finding and Using Resources |
| Intrallect intraLibrary 3.3: Getting Started - Finding and Using Resources |
| 1. | What is intraLibrary? |
| 2. | Getting Started: Logging In |
| 2.1. | Confirming Your Details |
| 2.2. | Agreeing to Terms and Conditions of Use |
| 2.3. | Navigating intraLibrary |
| 3. | Personalising intraLibrary: Your User Profile |
| 3.1. | Your Preferences |
| 3.2. | Your Properties |
| 3.3. | Your Usage Agreements |
| 3.4. | Your User Roles |
| 3.5. | Your Groups and Group Alerts |
| 3.6. | Your News Feeds and Podcasts |
| 4. | Searching intraLibrary |
| 4.1. | Using Simple Search |
| 4.2. | Browsing for Resources |
| 4.3. | Advanced Searches |
| 4.4. | Reordering Search and Browse Results |
| 4.5. | Saving Your Favourite Searches |
| 4.6. | Receiving Automatic Updates on Your Favourite Searches: RSS News Feeds |
| 4.7. | Finding and Selecting Images |
| 4.8. | Related Resources |
| 4.9. | Searching by User-Created Tags |
| 5. | Using Resources |
| 5.1. | Search Results View |
| 5.2. | Resource Page View |
| 5.3. | Images View |
| 5.4. | Viewing Resources |
| 5.5. | Commenting On and Rating Resources |
| 5.6. | Seeing More Information About a Resource |
| 5.7. | Tagging Resources |
| 5.8. | Downloading Resources |
| 5.9. | Linking to Resources in intraLibrary: Public URL |
| 5.10. | Viewing Archived Versions of Resources |
| 5.11. | Finding Related Resources |
| 6. | Gathering Resources of Interest to You |
| 6.1. | My Favourites |
| 6.2. | My Basket |
| 6.3. | RSS News Feeds and Podcasts: Listing and Delivering Resources of Interest and New Resources |
IntraLibrary is a digital repository system, which enables people to store, manage, share and re-use digital documents, e.g. learning materials, e-prints, images and so on, using a simple web-based interface. Managing such materials collectively can save time and effort, and build a valuable shared resource.
IntraLibrary is particularly good for storage, sharing, reuse and repurposing of learning materials. Learning materials can include documents, presentations, web pages, images and multimedia. They can be packaged for easy transmission, upload and delivery as standard content packages.
There are also many other types of digital resource that an organisation can store and manage using intraLibrary, including e-prints (with Dublin Core metadata and OAI-PMH harvesting); scanned academic papers and book chapters (with tools to support Copyright Licensing Authority reporting requirements); and JPEG images (with thumbnails in search results, light-box view of images, and support for NISO z39.87 and EXIF metadata).
All resources stored in intraLibrary include metadata (catalogue descriptions) to make it easy to find, select, retrieve and reuse them.
IntraLibrary enables people to:
Your installation of intraLibrary can be accessed through the Internet using any recent web browser, such as Internet Explorer or Mozilla Firefox, on any operating system.
Your administrator should have supplied you with a link to the homepage of your library, and a username and password. However, your library may be specially set up to be accessed via an externally managed system, such as OpenAthens or Shibboleth; if this is the case follow your administrator's instructions for logging in.
Otherwise, go to the homepage of the library in your web browser, and enter your username and password. If you have forgotten your password, click on the forgotten password? link and your password will be emailed to you. If this link does not appear, your administrator has turned this function off and you will need to contact them directly.
The first time you log in, you will be asked to confirm some details (or properties) for your user profile. These include your full name, your email address, your affiliation (e.g. your institution, project or department) and your preferred language. You may also change your password at this point. Your administrator may have specific instructions for filling this section in.
Once you have confirmed these details the first time, you will be able to check them or update them at any time by clicking on profile, then properties. Other aspects of your user profile are explained below in section 3 Personalising intraLibrary: Your User Profile.
For some organisations using intraLibrary, your administrator will ask you to agree to certain terms and conditions for using the library. If so, a form will appear the first time you log in. You will need to view the agreement, then click on agree, then update, in order to use the library.
Your usage agreements are available for viewing at any time by clicking on profile, then agreements. Other aspects of your user profile are explained below in section 3 Personalising intraLibrary: Your User Profile.
When you have logged in successfully, you will see several options for
what you can do next near the top of the screen.
The following table shows which options are available to you according
to the user type you have been assigned.
These options are explained in the following sections. Specific help
for the different parts and functions of intraLibrary is also available.
This can be accessed by clicking the help button  .
.
The user types in the table above are the intraLibrary standard user types. The administrator of your system may have created custom user types and in that case the set of options may be slightly different.
| Type of User | Search | Upload | Work Area | My Resources | Browse | Basket | Favourites | Profile | Admin |
| General or Guest | X | - | - | - | X | X | X | X | - |
| Contributor | X | X | X | X | X | X | X | X | - |
| Librarian | X | X | X | X | X | X | X | X | - |
| Administrator | X | X | X | X | X | X | X | X | X |
You can access your user profile at any time by clicking on profile. Your profile includes:
Each of these user profile sections is further explained below.
Also see Gathering Resource of Interest to You for more ways to personalise your use of intraLibrary.
You can set a number of user preferences for yourself by clicking on profile then preferences. The preferences you can set are as follows:
| Preference Type | Preference | Description |
| General | Default Timeout | Allows you to set how long after logging into intraLibrary the system will log you out, if you have not been using the library. |
| Email me when my resources are published? | Only for those users who can contribute resources to the library (Contributor, Librarian and Administrator users). Allows you to set whether you would like to receive a confirmation email when a resource you add to the library is published. | |
| Metadata Entry | Metadata Template | Only for those users who can contribute resources to the library (Contributor, Librarian and Administrator users). Allows you to set a default metadata template that will be applied automatically when you upload resources to the library. |
| Licence Pattern | Only for those users who can contribute resources to the library (Contributor, Librarian and Administrator users). Allows you to set a default licence pattern that will be applied automatically when you upload resources to the library. NB: Not all organisations using intraLibrary make use of the community licensing feature; refer to your local administrator to see if this is available to you. | |
| Discovery | Resource List Size | Allows you to set the number of resources you would like to see listed per screen for each search you carry out. The more resources you see per screen the longer it will take for the page to load. You can also change the number per page dynamically while searching or browsing. |
| Thumbnail List Size | IntraLibrary provides a link at the top of any search results screen that allows you to see a new page containing all the JPEG images from your search as thumbnails. You can use this setting to say how many images you would like to see on each page of thumbnails. | |
| Options for viewing single files | When you are looking at a list of search results, you can preview each listed resource (unless this feature has been switched off by your local administrator). There are two ways in which you can preview resources, and this setting allows you to select one as your default. The item view opens a single file or external link within your browser window or within the relevant application. For packaged resources containing multiple files, item view shows you the internal navigational structure of the package. The package view allows you to see the navigational structure specified in a content package, including packages containing single files. See section 6.1 Viewing Resources for more information. | |
| Default Saved Search | IntraLibrary allows you to save your favourite search configurations in advanced search. Once you have done this you can select a saved search here as your default. This search will automatically filter any other search you carry out. For instance, if you set your default search to search for PDF documents only, then any future search you carry out will only return a list of PDF documents that meet that search. | |
| Reduce Technical Format List in Advanced Search? | One of the ways in which you can search intraLibrary in the advanced search screen is by technical format. When you search by technical format you select from a drop-down list of technical formats. If you set this option as "Yes" the drop-down list will only include those technical formats for which resources exist in the library, rather than the full list of possible technical formats. So if there are only PowerPoint slides, Flash files and JPEG images in the library, those are the only three options you will be able to select from in your search. | |
| Show Numbers in Browse Tree? | Each browse category or node in the browse tree includes two numbers in brackets, e.g. (11/37). These numbers indicate how many resources are classified at that category or node, and how many are classified in total at and below that node. You can switch these numbers off, so they don't appear, by selecting "No" here. | |
| Hide empty nodes in browse tree? | In the browse tree some nodes will contain resources while others will be empty. If you don't want to see nodes which are empty select "Yes" here. | |
| Add intraLibrary search to browser? | By clicking on this icon you will add the ability to search intraLibrary from your current web browser search box. The results of a search through the browser may differ from the results of a search carried out through the intraLibrary interface because the browser-based search will only show resources in collections which have had external searching enabled. | |
| Misc | Email me when someone comments on or tags one of my resources? | Only for those users who can contribute resources to the library (Contributor, Librarian and Administrator users). If you set this as "Yes", you will be emailed comments other users have made about resources you have contributed to the library. |
| Clear Basket when Logged Out | Any resource you have put in your basket will stay there until you remove it. If you set this as "Yes", your basket will be cleared automatically whenever you log out. |
Remember that the settings you select in this preferences section will only take effect when you click on the "Updates prefences" button at the bottom of the page.
The first time you log into intraLibrary, you will be asked to enter personal details. See section 2.1 Confirming Your Details for more information. Whenever you are logged in you can access and edit these details by clicking on profile then properties.
It is important that these details are entered correctly so that various intraLibrary functions can work for you, e.g. so that you can receive email alerts. Your email address must be entered in the correct format (e.g. name@place.com). You can also change your password here.
Your library's administrator may have required you to click "Agree" to terms and conditions of use when you log in. See section 2.2 Agreeing to Terms and Conditions of Use for more information. If you have "signed" an agreement in this way, you can look at your agreements at any time by clicking on profile then agreements. You can also reject any agreements you previously accepted; doing so may mean you are no longer allowed access to the library.
The User roles section of your Profile is simply for information. It shows you the user roles you have been given by the administrator and the actions within intraLibrary that these roles can carry out..
All intraLibrary users belong to one or more groups. These groups are set up and managed by your administrator. They allow for different users to have access to different workflows and collections. Workflows only apply to those users who may contribute resources to the library, while access to collections applies to all users.
All users can see which groups they belong to by clicking on profile then groups. From there you can select what kind of email alerts you would like to receive related to your groups' workflows (you may receive group alerts even if you don't have access to workflows). For more information on contributing resources see the intraLibrary manual Getting Started- Uploading and Cataloguing Resources. For more information on setting up groups and workflows, see the intraLibrary manual Administrator's Guide.
You can be notified about new resources in the library by setting up an RSS news feed for any search you carry out. You can use any feed reader to receive these alerts. IntraLibrary also keeps a record of your news feeds, with the names and descriptions you have given them, in your profile: click on profile then news feeds. You can see current search results for feeds here, and delete feeds. For more details, see below under section 4.5 Receiving Automatic Updates on Your Favourite Searches: RSS News Feeds, and section 5.3 RSS News Feeds: Listing Resources of Interest and New Resources.
This area in your profile also lists podcast feeds you have created. Like RSS news feeds, these can be viewed and deleted from here. For more details, see below under section 5.4 Podcasting Resources.
For more detailed information on searching intraLibrary, consult the intraLibrary manual Advanced Search Methods.
The simple search box is always available from any screen in intraLibrary. It is similar to Google: you can type in any word or words and click search. You will then see a list of resources matching your search words in the lower right-hand side of the screen.
You can also:
Consult the intraLibrary manual Advanced Search Methods for more details on constructing complex searches: there are many other powerful features available.
When the results of a simple search are listed in the right-hand screen, you will immediately see the advanced search view on the left, so that you can further refine your search if you wish to. For more information on how to do an advanced search, see section 4.3 Advanced Searches below.
There are a number of clickable buttons and other links and information that accompany each resource in the search results listing. These are explained further in this section, and in section 6 Using Resources.
To browse the library, select Browse at the top of the page. In the browse screen, resources are categorised using a classification system or taxonomy, in a similar way to books in a traditional library. Your library may include a number of different classification systems. Any given resource may be classified in a number of different places within a classification system or systems.
The classification systems are displayed on the left-hand screen in the form of a browse tree of categories and sub-categories. Usually these categories will be subjects or topics, but you may have other classifications available in your library, such as educational levels or competencies.
Click on the coloured icons to expand the tree to find a category you
are interested in,
e.g.: 
 . The
number of resources
classified at or below any category are indicated by two numbers in
brackets. The first number is the number
of resources classified at that category; the second number is the total
number classified at or below that category.
If you don't want to see these numbers, you can switch them off by
clicking on profile then selecting "no"
for Show numbers in browse tree? in your preferences.
. The
number of resources
classified at or below any category are indicated by two numbers in
brackets. The first number is the number
of resources classified at that category; the second number is the total
number classified at or below that category.
If you don't want to see these numbers, you can switch them off by
clicking on profile then selecting "no"
for Show numbers in browse tree? in your preferences.
To display all the resourcess classified at a given category, click on the category's name. The resources classified at that category will be listed in the right-hand screen. You can choose to see all the resources classified at and below a given category by selecting the tick box option Include resources below node at the top of the browse tree, then clicking the category name.
IntraLibrary allows you to carry out complex searches. For instance, you can look for resources in a particular format or by a specific author, or combine both these searches (e.g. searching for all Flash animations by Charles Dickens). As noted above under section 4.1 Using Simple Search, you will see an advanced search screen on the left-hand side of the screen after carrying out a simple search, allowing you to refine your basic search. You can also carry out an advanced search at any time by clicking on the Advanced search link immediately below the search box.
In both cases, you will see a form for defining your search in the left-hand panel. The first step is choosing what attribute you wish to search by (e.g. "Title", "Keyword" or "Technical Format"); this can be selected from the select search field drop-down menu. You can also choose here to search by collection or you can select a search you previously saved.
For some search fields, you will be offered a box to fill in with your own words (e.g. for searching by "Title" you would enter words you think may appear in the titles of resources you want to find). For others you will be offered a drop-down menu of words used in that field (e.g. for searching by "Technical Format" you will see a list of formats to select from).
You can further refine your search by selecting add to add another search field to your search. You can select remove to take search fields out of your search.
You can also decide whether you want to search for resources containing all of your search terms, or resources containing any of your search terms:
You can change the order in which any list of resources in the repository appears. When you do so, it applies to the whole list, not just the page/screen you are viewing. You can change the number of resources that appear per page in your user preferences, or by selecting from the top of the resource listing. Search results are automatically listed in order of their relevance to your search: this option is always available in a search results screen, so you can return to it from another ordering. The other ways in which you can order a list of resources are as follows:
From the advanced search page it is possible to save your favourite searches, so you can reuse them easily. Click on Save at the bottom of the search form once you have created your search. Enter a name for your search in the box that appears, and click on Save.
You can reuse your saved searches at any time by selecting Saved search from the drop-down menu under select search field. A further drop-down menu will appear listing all of your saved searches. When you select one, the advanced search form will immediately be repopulated with your saved search. Click Search to run the search again. If any new resources that meet your search have been added to the library since you last ran the search, they will appear in the results list along with the original resources.
Users who have permission to contribute resources to the library can also use their saved searches to search their Work Area. For more information, see intraLibrary manual Getting Started- Uploading and Cataloguing Resources, in section 3.1 Creating and Editing Metadata: Cataloguing Resources in the Library.
IntraLibrary allows you to receive automatic notifications of new resources that meet your favourite searches and browse categories. To take advantage of this without having to log into the library, you will need an RSS feed reader. For podcasts you will need a standard podcast application such as iTunes.
To set up a notification, or news feed, carry out the following steps:
 .
A box will open up.
.
A box will open up. and a podcast link
  .
.You can access your RSS feeds and podcasts within intraLibrary at any time by clicking on profile then news feeds. You can view current results from your feed search there by clicking view results. You may delete feeds from this screen as well.
You can search for particular image types (e.g. JPEGs, GIFs, etc.) in advanced
search by using the
technical format option (see above under section 4.3
Advanced Searches for more information).
You can also see thumbnails for JPEG images in any search or browse you
carry out by clicking on the "Show only
images" icon  and
see full-sized images by clicking on the thumbnails.
and
see full-sized images by clicking on the thumbnails.
From the image view you can carry out the same actions on the images as you would on any list of resources in intraLibrary.
NB: IntraLibrary supports this image viewing functionality only for JPEGs at present, due to the number of people producing these images through digital photography. Further image formats will be added in future versions.
It is also possible to discover "related" resources in intraLibrary. This is described in more detail in section 5.8 Finding Related Resources.
Users can add their own tags to resources in any search or browse results list. These tags go into the resource's metadata, so any user can find a resource with a given tag by either clicking on that tag on a Resource Page; entering it into the simple search box; or selecting Tag in advanced search and entering the tag in the search box there. You can use any of these searches to create an RSS News Feed or podcast for that tag as well.
Whether you find resources in intraLibrary by simple or advanced search, or by browsing, the results will always be presented to you as described in the following sections of this manual. The first view of resources is usually the Search Results view but you may also find the Resource Page and Images views helpful. All of these are described in this section.
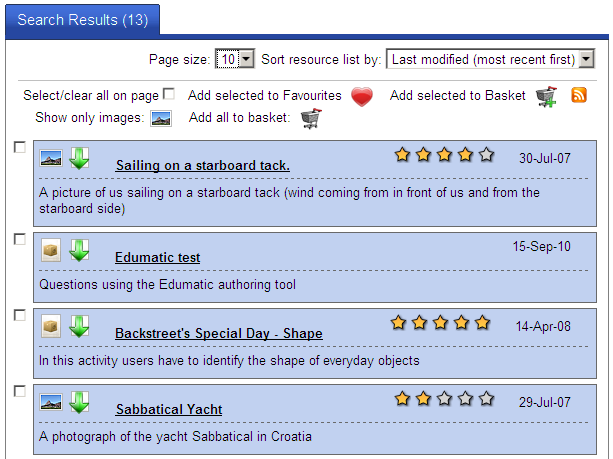
The search results view is a list of resources that matches the search or browse criteria you have used. The example below shows a typical search results list.
At the top of the list are two drop-down menus which you can use to change the appearance of the list:
The next set of options at the top of the list allow you to carry out actions on individual resources or groups of resources by clicking on the appropriate icon. They are:
 Clicking
on this icon will enable you to add the selected resource(s) to
your favourites. See My Favourites for more
information.
Clicking
on this icon will enable you to add the selected resource(s) to
your favourites. See My Favourites for more
information.
 Clicking
on this icon will enable you to add the selected resource(s) to
your basket. See My Basket for more information.
Clicking
on this icon will create an Images view. See Images
View for more information.
Clicking
on this icon will enable you to add the selected resource(s) to
your basket. See My Basket for more information.
Clicking
on this icon will create an Images view. See Images
View for more information.
 Clicking
on this icon will enable you to add all the resources in these
search results, including those on other pages of the list,
to your basket. See My Basket for more
information.
Clicking
on this icon will enable you to add all the resources in these
search results, including those on other pages of the list,
to your basket. See My Basket for more
information.
 Clicking
on this icon will enable you to create an RSS news feed or podcast
based on the search or browse criteria you have used.
See RSS News Feeds and Podcasts for more
information.
Clicking
on this icon will enable you to create an RSS news feed or podcast
based on the search or browse criteria you have used.
See RSS News Feeds and Podcasts for more
information.
In the results list each resource is contained in a single shaded area.

This includes:
The Resource Page contains detailed information about each resource. A typical Resource Page is shown below. The Resource Page opens in a new tab and the original Search Results view is still available. You can switch between these views at any time by clicking on the tabs.
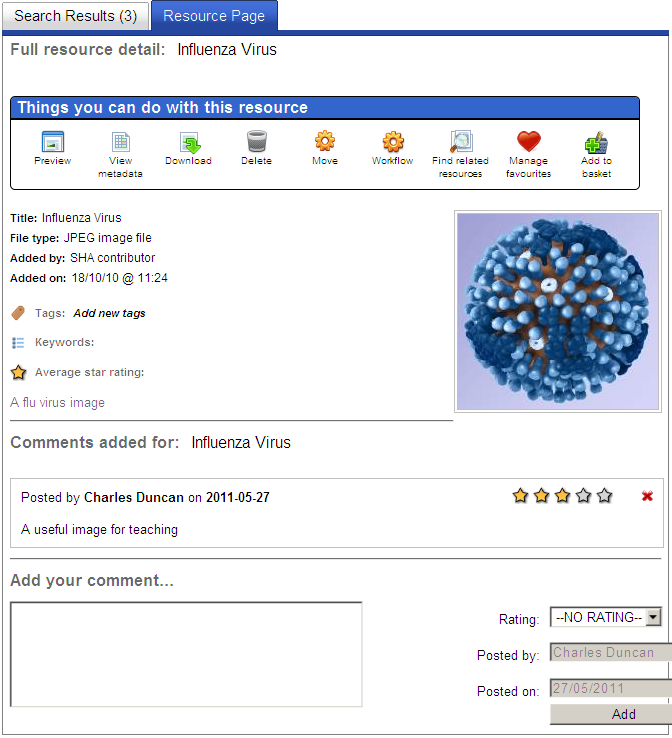
The Resource Page view contains a panel headed "Things you can do with this resource". The icons in this panel show the actions you can carry out on this resource by clicking on each icon. The available actions will depend on the way your administrator has configured your system and the icons shown here may not all be available. It is also possible that your administrator has made different actions available for different resources so the available icons may vary from one resource to another.
The set of potential actions are:
 Preview the resource. Usually if it is a single file it
is sent to
your web browser which will handle it according to your established
preferences. If it is an IMS or SCORM content package it will
be presented through the IntraLibrary package previewer as
configured by your administrator. More information is available in
Viewing Resources
Preview the resource. Usually if it is a single file it
is sent to
your web browser which will handle it according to your established
preferences. If it is an IMS or SCORM content package it will
be presented through the IntraLibrary package previewer as
configured by your administrator. More information is available in
Viewing Resources
 Display all the metadata
associated with this resource. Dependinbg on the way your administer
has configured the system some metadata items may
appear as links. Clicking on these links will search for other
resources using the same terms.
Display all the metadata
associated with this resource. Dependinbg on the way your administer
has configured the system some metadata items may
appear as links. Clicking on these links will search for other
resources using the same terms. Opens the download options. See Downloading
Resources
for more details.
Opens the download options. See Downloading
Resources
for more details. Opens the related resources
options. See Finding Related Resources
for more details.
Opens the related resources
options. See Finding Related Resources
for more details. Opens the Favourites
options. See My Favourites
for more details.
Opens the Favourites
options. See My Favourites
for more details. Adds the resource to your basket.
See My Basket
for more details.
Adds the resource to your basket.
See My Basket
for more details.The remaining parts of the Resource Page contain some metadata: title, description, keywords, thumbnail image for JPEG images, average star rating if the resource has been rated and licence information if the resource has a licence applied to it.
In addition the Resource Page offers users the opportuntiy to add their own tags, star ratings and comments as described in the following sections.
If you are a Contributor, Librarian or Administrator user, and are therefore able to contribute and manipulate resources in the library, you will see additional options in the Resource Page view. To find out about these see the Getting Started- Uploading and Cataloguing Resources manual.
The search results list is usually an excellent way to scan a set of resources and decide which you want to investigate in more detail. However, for images it is more useful to scan thumbnails of the images to see which you want to find out about. In the Images View you see an array of image thumbnails. This currently only shows JPEG images.
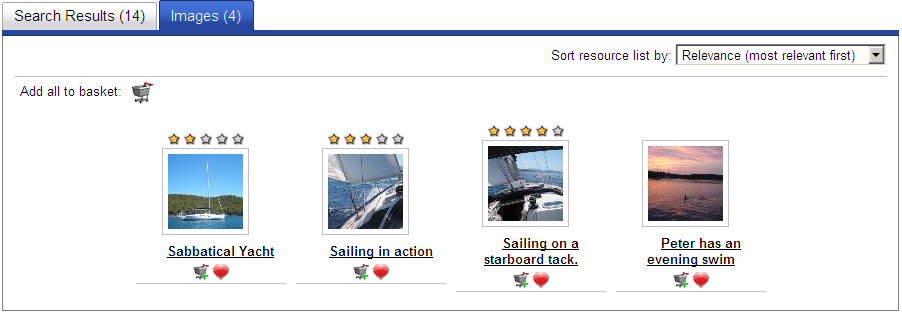
This view offers all the same functions as the results list view. You can add items to your basket and favourites and view the resource page by clikcing on the title. In addition, if you click on the thumbnail you will see a full-sized view of the image. Clicking anywhere on the screen will close that full-sized view.
IntraLibrary allows you to preview resources once you have found them. You can view individual resources and external web resources directly. You can also fully explore complex resources stored as standard content packages. IntraLibrary supports packages in IMS Content Packaging and SCORM formats. When a package includes interactions and navigation these will all be fully operational in the preview.
When you select the preview icon on
the resource page
a new window will open showing you the resource. NB: If you don't
have the correct software to open a resource, you will not be
able to view it, e.g. if you try to view a Flash animation and
don't have a Flash player installed on your computer, you will be able
to
download the file but you will not be able to view it. More
information about viewing resources is given in this section.
The way you see a resource depends first of all on whether you have selected package or item view as your default view in your user preferences. The two possibilities are explained below:
Item view means that every resource you view will open directly, either in a browser window or in the application used for that resource. This depends on the type of browser you are using and the type of resource. For instance, in some cases a PDF document will open in your browser window while a PowerPoint document will open in PowerPoint; in other cases they will both open in your browser window. In any case, for single files you will be able to view or download the resource (for more details on downloading resources, see below under section 6.5 Downloading Resources). The only exception in item view is if you preview a resource that consists of a set of smaller resources packaged in a content package. In this case you will see a left-hand pane allowing you to see the "organisation" or content structure of the package, while the resource will appear in the right-hand screen, where you can fully explore it.
Package view means that every resource you view will open in the right-hand pane, with package information on the left-hand pane (see below for more details about this). This is because even single files in the library are stored as standard content packages, and some users may wish to have content packaging functionality available for any resource they are working with.
With either viewing option, when you are looking at a resource in the right-hand pane with content packaging information on the left, you can choose to see the resource using resource view or navigation view. These two options are available from a drop-down menu on the left-hand screen. Content packages consist of zip files with a table of contents which determines what order the resources will be presented in, known as an "organisation". In navigation view, this "organisation" will be shown in the left-hand screen, and you will be able to view individual resources within the package, in the right-hand screen, in the order they were intended to be seen. In resource view, the left-hand screen will contain a simple list of all the resources used in the package. In either view, you can click the export package link to download the resource as a content package (for more details on downloading resources, see below under section 6.5 Downloading Resources).
Wherever you see the www button in the preview screen you can use it to create a Public URL for linking directly to the package or resource in the library. For more information on this see section 6.6 Linking to Resources in intraLibrary: Public URL.
You can comment on and give a star rating to any resource (NB: your administrator may remove this permission for certain collections). Other users can view these comments and ratings. On the Resources Page (near the bottom) you can see comments and star ratings from other people and add your own. You can add a comment by typing into the text field and clicking add. You can add a star rating by selecting from the drop-down menu and clicking add. Your name and the date when you add a comment and/or star rating will be automatically recorded. The average number of star ratings will be refreshed immediately.
Select the more link in any resource's listing to expand the
information you can see. To see all of the recorded
information (metadata) about the resource, click on the View
metadata icon on the Resource Page.
You can add your own tags to a resource by clicking the Add new tags link on the Resource Page, typing words into the box that appears, then clicking the + sign. You can add several tags at once by entering any number of words with spaces in between. If you want to add a single tag with more than one word in it, enter them by using an underscore, e.g. to tag something as "Barcelona holiday 2007" enter "barcelona_holiday_2007".

As well as your own tags you can see the tags others have entered as well, and click on any tag to search for other resources with that tag. The tagged resource list will appear in a new tab on the page so that you can still return easily to the Resource Page.
To delete your tags click on Edit your tags and on the '-' sign beside the tags you wish to remove.
IntraLibrary allows you to download resources from the repository and save them locally on your computer. There are two ways to do this:
1. Downloading a resource when previewing it: When you preview a
single file by clicking the preview
icon or by clicking on the resource's icon on the Search
Results view,
you can then save it as you normally would when downloading a
file in your browser. For instance, you can select the
save option if presented with this by your browser, or
you can right click on the resource and select the save
option. You can also download a single file resource or a
package from preview as an IMS Content Package by
clicking the export package link.
For more on previewing resources in the library, see above under
Viewing Resources.
2. Downloading resources using the Download button: To
download any resource, click on the download
icon. The options will vary according to whether you are
downloading a single file, a content package, or a link to an
external resource; this means that you will sometimes see
options that are greyed out because they are not available
for the particular resource type. The basic download
options will appear first at the top of the window, with an
option to click on advanced options for more experienced
users. NB: If the download icon is not available
then your administrator has disabled download functionality for
that resource; you will need to contact them directly.
The following illustration shows the download pop-up window,
with both basic and advanced search options open:
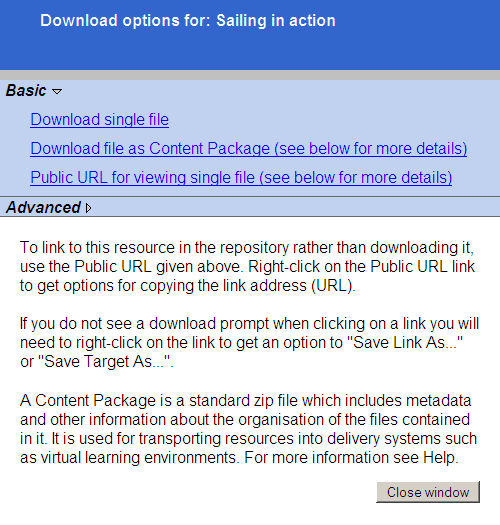
The basic download options are as follows:
Advanced Download Options: As noted above, you can click to view a set of advanced options from within the download window. These are:
Downloading SCORM packages: IntraLibrary will import SCORM content packages, and allows users to export them intact. In order for a content package to conform to SCORM, it must use IEEE LOM metadata. Therefore the first two options in the advanced download screen differ when a resource that was imported as a SCORM package is being downloaded: rather than saying "Packages: Download as Content Package with LOM metadata" they will say "Packages: Download as SCORM Content Package with LOM metadata". The other options are available, but because they either change LOM metadata to IMS metadata, or strip out extensions, or both, the resource as downloaded will no longer conform to SCORM and will simply be an IMS Content Package. NB: You cannot export a package as a SCORM package unless it was imported as a SCORM package. There are SCORM packaging editors available that allow you to create and edit SCORM packages.
Downloading external resources: IntraLibrary allows you to store information about external resources (e.g. web links and details about non-digital resources). When you select the download option, the basic view will say "This learning resource is not stored in the repository. It cannot be downloaded from the repository. It is located here: [location]". However, it is still possible to use the advanced download options given above; in this case the resource within any content package downloaded will be the URL or other external locator for the resource along with its metadata, rather than the resource itself. All resources in the library have catalogue records, or metadata, so it is also possible to use the options for downloading metadata for external resources.
As an alternative to downloading resources, the Public URL
feature gives you a web link (URL) which you can
use to deliver resources stored in intraLibrary from anywhere,
e.g. on a VLE/LMS or web site, in a blog, in an email, or on a
reading list. You can get a Public URL from the download
options window, as noted above under
Downloading Resources. You can also get it from the preview
window, as noted under Viewing
Resources. From the preview window, select navigation
view from the drop-down menu; each resource will
have a  button next to it. When this button is clicked, a
link for
the Public URL appears in the right-hand screen. You can
copy and paste this URL using the usual method for your browser.
button next to it. When this button is clicked, a
link for
the Public URL appears in the right-hand screen. You can
copy and paste this URL using the usual method for your browser.
As noted previously, complex resources consisting of a number of smaller files can be stored in intraLibrary as content packages. Public URLs are available for each individual resource within a package, as well as for the whole package. This means that you can deliver a single resource from a package without having to download the whole package and disassemble it.
All resources with earlier versions archived have a View Archived
Versions link.
 When this link is clicked, a new tab
opens with the resource and all of its earlier versions listed below
it in chronological order of upload to the library.
You can Preview, View Metadata for and Download individual versions
of a resource. You can also put individual versions
of a resource in your Basket for bulk download. The View Archived
Versions listing of resources includes the date they were
uploaded, as well as any version or status information from the
resource's metadata.
When this link is clicked, a new tab
opens with the resource and all of its earlier versions listed below
it in chronological order of upload to the library.
You can Preview, View Metadata for and Download individual versions
of a resource. You can also put individual versions
of a resource in your Basket for bulk download. The View Archived
Versions listing of resources includes the date they were
uploaded, as well as any version or status information from the
resource's metadata.
Every resource has a Find related resources icon.
Clicking this icon
opens a box which gives you options to search for related resources,
as follows:
You will see a list of possible relationships between resources that you can search by. For instance, if you want to find the resource presented in different formats, tick the checkboxes for This resource in new formats and This resource in its original format, then search. A new tab will open listing all the resources in the library that are related to the original resource in those two ways. You can also search by all of the possible relationships.
Your administrator may have also set up a reference search
option. If you View metadata using the icon on the Resource Page
then some of the metadata fields in the full record may be links,
you can click on the link to
perform a search based on the contents of the link. This search will be
run as a simple search, e.g. if you click
a Title link with the words "Horses" in it, a simple search will
be carried out on the term 'horse', as if you'd
typed it into the search box.
IntraLibrary offers several ways of personalising your use of the library by gathering together resources of interest to you. These include:
Using each of these functions is covered in more detail in the following sections.
You can bookmark resources using the My Favourites node at the top of the browse tree. You can also organise your favourites by creating categories below the My Favourites node. Click on the "browse" tab near the top of the screen; the My Favourites node appears near the top of the left-hand pane.
You can add any resource in any listing to your favourites by selecting
the "manage favourites" icon:
 . A box will open allowing you to
bookmark the
resource at the My Favourites node by clicking on the '+' sign next to
it. If the resource is already bookmarked under My Favourites,
a '-' sign will appear instead; clicking on this removes the resource
from My Favourites. If you have created categories underneath
your My Favourites node, you can add and remove resources to and from
these similarly.
. A box will open allowing you to
bookmark the
resource at the My Favourites node by clicking on the '+' sign next to
it. If the resource is already bookmarked under My Favourites,
a '-' sign will appear instead; clicking on this removes the resource
from My Favourites. If you have created categories underneath
your My Favourites node, you can add and remove resources to and from
these similarly.
You can also add new folders as you are bookmarking your favourites. First select the node you want to act as the parent of your new folder, then type the name of the new folder in the text box and click Add new folder.
 . This takes you into "edit" mode.
 .
.To add subsequent sections, click either the My Favourites heading, or on an existing section of My Favourites, and follow the instructions listed above under "Adding Your First Section".
You can delete any section, including sections which contain
sections. To do this, click on the name of the section you want to
delete, and click the delete button:  .
.
Select a section by clicking on its title. You can choose to delete the section, add a sub-section, or cut-and-paste the section into a new position in the tree.
The following functions are available:
|
|
Add: Create a new sub-section inside the selected section. |
|
|
Delete: Delete the section. |

|
Cut: Move the section and its contents to another position (where "paste" is applied). |

|
Paste: Paste the contents of a "cut" into the selected section. |

|
Import: Import a classification system. (ZThes XML format only). |
As with any search or browse listing, you can create a news feed or podcast for your favourites, or for any sub-heading you create within My Favourites.
My Basket is for collecting resources to perform bulk actions on them. The contents of your Basket can be viewed at any time by clicking the My Basket button near the top of the screen.
Any resource you see in intraLibrary can be added to your Basket by
clicking on the Add to Basket button:
 . Once a resource is in your Basket,
its Add to Basket button becomes a Remove from Basket button
. Once a resource is in your Basket,
its Add to Basket button becomes a Remove from Basket button  , so you can immediately remove any
resource from your Basket without having to go to the Basket.
, so you can immediately remove any
resource from your Basket without having to go to the Basket.
You can also move an entire list of resources into your Basket at once by clicking the Add All to Basket link at the top of the Search Results view. Note the distinction between Add selected to basket and Add all to basket, both of which are available. Add all to basket adds everything in the search results even when the results span several page. Add selected to basket only adds the resources selected using the check boxes to the basket. If you choose Seelct all on page then only the resources displayed on the current page are selected and only these will be moved to the basket.
To remove all resources from your Basket in one click, go to your Basket and click Clear Basket in the left hand side of the screen. You can ensure that your Basket is cleared every time you log out of the system by setting the relevant user preference Clear basket when logged out to "Yes".
Removing resources individually or clearing your Basket does not delete them from the library, it merely removes them from your Basket.
If a resource you added to your Basket no longer appears in the Basket, it is likely that the resource has been deleted from the library, or moved to a collection or workflow you don't have access to, by an administrator, or by the resource's original owner. Check with your administrator if you think a resource has disappeared from your Basket.
You can download the entire contents of your Basket in one .zip file, by clicking Export Basket in the left-hand screen. When you export the contents of your Basket, each resource in the Basket goes into the resulting .zip file as an IMS Content Package with the resource's metadata included in IEEE LOM format. This includes resources that are single files, and external Web resources. For external Web resources, the IMS Content Package contains the URL or other external locator for the resource. NB: Your administrator can set a maximum basket upload size; if your basket is larger than this you won't be able to export its contents and will need to remove some resources.
Librarian and Administrator users can also delete and move resources in bulk using their Basket. See the Librarian's Guide for more information.
IntraLibrary allows you to set up and receive automatic notifications or podcasts of new resources that meet your favourite searches and browse categories. To take advantage of this without having to log into the library, you will need an RSS feed reader. For podcasts you will need a standard podcast reader such as iTunes.
To set up a notification, or news feed/podcast, carry out the following steps: