| Intrallect intraLibrary 3.3: Getting Started- Uploading and Cataloguing Resources |
| Intrallect intraLibrary 3.3: Getting Started- Uploading and Cataloguing Resources |
| 1. | Contributing Resources to the Library: Introduction |
| 2. | Adding a Resource to the Library |
| 2.1. | Selecting a Workflow Process to Upload To |
| 2.2. | Selecting a Collection to Upload To |
| 2.3. | Uploading Resources |
| 2.3.1. | Uploading Single Files |
| 2.3.2. | Uploading Complex Objects: Content Packages |
| 2.3.3. | Adding Links to External Web Resources |
| 2.3.4. | Adding References to Physical Resources |
| 3. | Actions in a Workflow |
| 3.1. | Your Work Area |
| 3.2. | Working on a Resource |
| 3.3. | Creating and Editing Metadata: Cataloguing Resources in the Library |
| 4. | Updating a Resource with a New Version |
| 5. | Linking Related Resources |
| 6. | Licensing, Copyright, and Conditions of Use Information for Resources |
| 7. | Publishing: Making a Resource Available to Others |
| 8. | My Resources |
Users who have contributor rights to use intraLibrary may add resources to the library. If you have contributor rights then you will see a Work Area option near the top of your screen.
If you think you should have contributor rights to the library and you don't see this view, contact your local administrator.
IntraLibrary allows administrators to set up workflows involving any number of different processes and people. This means that contributing resources to the library can be very basic, with one person doing the uploading, cataloguing and publishing of a resource, or more complex, with a number of different people performing different actions at different stages. The kinds of actions that can be carried out in a workflow when contributing a resource include:
In addition, there may be a number of collections within your library that you can contribute to, and you may belong to one or more groups that have access to different workflows and collections. All of this will be set up by your administrator, and they should provide you with specific instructions. Clearly, the number of possible permutations is vast. This guide therefore takes a very simple workflow as an example to illustrate the main things you will need to understand and do when adding a resource to the library:
As noted above in section 1 Contributing Resources to the
Library: Introduction, Contributor
users have a work area which can always be accessed by clicking
the tab near the top of the screen.
To add resources to the library, click on work area, then on the Upload
icon:
 . A series of options will
then be shown to you that guide you through the upload process.
. A series of options will
then be shown to you that guide you through the upload process.
The first option in the upload form will be Upload into Group/Process. You will be presented with a drop-down menu from which you should select the workflow process you wish to upload your resource or resources to. If you only have access to a single workflow process, it will already be selected for you. Otherwise, follow your local administrator's instructions for selecting a workflow process. You will then see options to Upload into Collection(s).
The next option in the upload form will say Upload into Collection(s), with a list of collections underneath. You can upload your resource or resources to any number of collections from this list. You can use your browser's usual method for selecting multiple collections from the list, e.g. hold down the CTRL key while selecting collections. If you only have access to a single collection, it will already be selected for you. Otherwise, follow your local administrator's instructions for selecting a collection or collections, then go to section 2.3 Uploading Resources for details on what to do next.
The next option in the upload form will be Upload Resource. You must then select what kind of resource you wish to add to the library, from the following three options:
The rest of this section gives specific instructions for adding different resource types to the library.
Single files, for example Word documents, PowerPoint presentations, PDFs, images, etc. can be added to intraLibrary. To upload a single file use the following steps:
 icon to enter
further resources. Repeat steps 6-7 for each resource.
icon to enter
further resources. Repeat steps 6-7 for each resource.There may be a delay while your file is uploaded. This can be very short, but uploading a very large file, or a large number of files over a slow network connection may take much longer. When your file has finished uploading you will see the message: resources were successfully imported.
The next step is to add information describing or cataloguing the resource. This information about a resource is known as metadata; see below under section 3 Cataloguing a Resource for more details.
A resource that contains more than one file must be uploaded as a standard content package that is compliant with the IMS Content Packaging specification or with SCORM. A content package is a .zip file that contains all the files used within the resource, and a manifest file that functions like a table of contents for the whole resource, determining its structure, or the order in which learners will see the resources within the package. There are many tools available that you can use to create and edit standard content packages.
Uploading a packaged resource is exactly the same as uploading a file; follow the process noted above in section 2.3.1 Uploading Single Files. You will be selecting a file that has a .zip file extension from your file system. IntraLibrary will automatically check whether this is a normal .zip file or a content package. Content packages are validated as standard IMS or SCORM packages by intraLibrary before they are imported into the system. If your content package is invalid it will need to be fixed before it can be uploaded.
The next step is to add information describing or cataloguing the resource. This information about a resource is known as metadata; see below under section 3 Cataloguing a Resource for more details.
IntraLibrary allows links to resources held elsewhere on the Web to be added to the library, and catalogued and classified like any other resource. This means that users can find relevant resources through a single intraLibrary search whether or not they are stored in the library. To add a Web link to the library use the following steps:
icon to enter
further resources. Repeat steps 6-7 for each resource.The next step is to add information describing or cataloguing the resource. This information about a resource is known as metadata; see below under section 3 Cataloguing a Resource for more details.
IntraLibrary allows references to physical, or non-Web-based digital resources, such as books, journal articles, videos, etc., to be added to the library, and catalogued and classified like any other resource. This means that users can find relevant resources through a single intraLibrary search whether or not they are stored in the library, or indeed available in digital format at all. To add a reference to a physical resource to the library use the following steps:
Select the Upload icon:
icon to enter
further resources. Repeat steps 6-7 for each resource.The next step is to add information describing or cataloguing the resource. This information about a resource is known as metadata; see below under section 3 Cataloguing a Resource for more details.
Reserved and Available Tabs: In order to get started with adding
or editing metadata for resources, or any other actions in your
workflow,
click on your work area button  near the
top of the screen; you will immediately be taken to the
reserved tab. This is where resources that you have permission
to work on, and that you have set
aside for yourself, are listed. There may also be resources available
for you to work on in the available
tab. You can reserve resources in the available area by clicking
on the reserve resource icon:
near the
top of the screen; you will immediately be taken to the
reserved tab. This is where resources that you have permission
to work on, and that you have set
aside for yourself, are listed. There may also be resources available
for you to work on in the available
tab. You can reserve resources in the available area by clicking
on the reserve resource icon:
 .
Noone else can edit resources that you have reserved. You can send
resources back into the
available tab from your reserved tab by clicking on the unreserve
resource button:
.
Noone else can edit resources that you have reserved. You can send
resources back into the
available tab from your reserved tab by clicking on the unreserve
resource button:
 . This makes them available to everyone in your group
with access to the workflow stage the resource is in.
. This makes them available to everyone in your group
with access to the workflow stage the resource is in.
Searching your Work Area: You can have any number of resources in your work area. If you have a large number, you may find it useful to be able to search them. You can search your reserved and available areas using the search box on the left-hand side of the screen called Filter Resources. You can search by group workflow stage, or by using a saved search you have previously set up in the Advanced Search screen. For more information on this, see section Saving Your Favourite Searches in the intraLibrary manual Getting Started- Finding and Using Resources. You can also choose to see resources that others in your group or groups have reserved by selecting the Show resources reserved by others checkbox.
This section describes how to carry out actions in your workflow. To see what actions are available to you click on the title of the resource in your reserved work area. You will find that in this area the resource page has more information than a resource page outside the work area - it now includes a section headed your workflow actions. The actions available to you depend on how your administrator has set up your workflow so the number and type of actions may differ from those shown below.
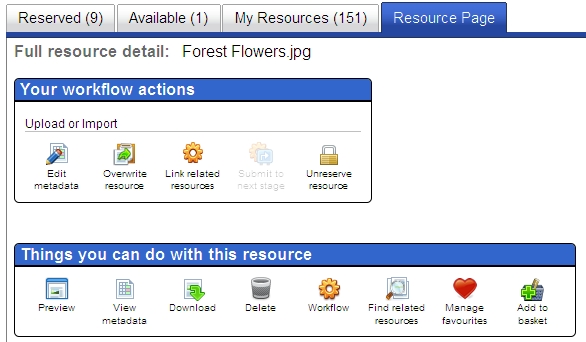
You may carry out the actions in this section in any order. There will usually be an action submit to next stage which is not available until other essential actions have been completed. If you click on this unavailable "greyed out" action you will be informed what actions must be completed before this button will become available.
In the following section we will describe how to carry out a number of common actions:
 |
Edit metadata: Cataloguing Resources in the Library |
 |
Overwrite resource: Updating a Resource with a New Version |
 |
Edit rights: Licensing, Copyright, and Conditions of Use Information for Resources |
 |
Link related resources |
 |
Submit to next stage: Publishing - Making a Resource Available to Others |
Now you can create a basic description for a resource, a process known as cataloguing, or creating metadata. The purpose of the information you add here is to allow people to find the resource in the library, and to provide them with details about the resource that might help them to select or use it. It is also important that this information is correct as it helps to identify who is responsible for creating the resource, thus ensuring that authors and other contributors are acknowledged. It can assist with use of the resource by providing technical information, such as what format the resource is in, and educational information, such as how you use it yourself with students.
The managers of your intraLibrary installation will have made decisions about what metadata should be created for resources, and how. Your administrator will have set the system up accordingly. This means that there are a number of possible permutations for metadata and workflows, so this guide aims only to give you a basic overview for general use of the Metadata Editor. Please consult your local administrator's guidelines for more information.
Click on the edit metadata icon for the resource you want to describe. This takes you to the Metadata Editor.
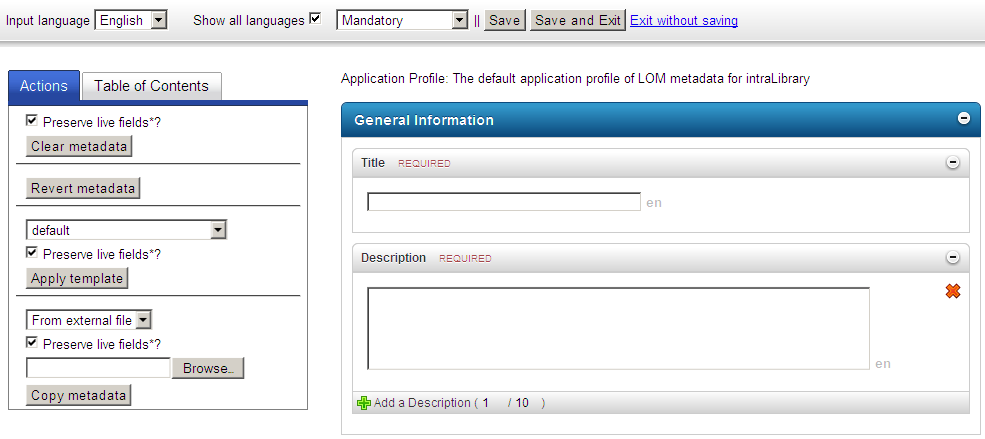
The left side of the metadata editor contains power tools which make it easier and faster to create and manage metadata. The right side of the editor contains a number of metadata fields for you to complete - possibly more than shown here. Across the top are options that modify the metadata editor view and allow you to save and leave the editor.
Filling in Metadata Fields
IntraLibrary allows administrators to set up the system to fill in some of the metadata fields automatically, so you may see some fields filled in already. You can select which metadata fields you wish to see in the Metadata Editor by using the drop-down menu in the toolbar. Usually one of the options to select is mandatory (as in the example in the illustration above); if you select this option you will only see those fields that you must fill in for the resource to be moved to the next stage in its workflow. You can, however, select any viewing option for the metadata, and fill in those fields that are available to you. In any view of the metadata in the Editor, mandatory fields are indicated by REQUIRED in red.
Saving Metadata
There are three options for saving metadata in the Metadata Editor toolbar: save; save and exit; and exit editor.
Power tools: Saving Time by Reusing Metadata
IntraLibrary offers you several ways of reusing metadata from other resources when cataloguing a new resource. Some resources may be very similar, for instance, a set of images of the same thing by the same photographer, or a set of slide shows for the same course by the same lecturer. These tools allow you to save time when cataloguing such similar resources. The tools, which are available in the left-hand screen of the Metadata Editor (see illustration above), are as follows:
Apply template: A template is a document in XML format that allows the system to automatically fill in any number of metadata fields or classifications for a resource. Your administrator may have made one or more templates available in the system. For instance, there may be a default template that is applied to general resources, and another template that is applied to a special collection, or a specific resource type, such as all videos or photographs. If this is the case, these templates will appear in a drop-down menu above apply template in the Metadata Editor Tools screen. NB: If there is more than one template in the system, you can select one of these to be your own default metadata template; this will always automatically populate resources you upload with metadata. To set your own default template, click on profile, then preferences in the main toolbar at the top of the screen. Otherwise, to apply a template:
The metadata fields for your resource will be automatically filled in by this template. You can still edit this metadata for the new resource, and add additional metadata, once you have done this.
Copy metadata from external file: IntraLibrary allows you to save the metadata record for any resource in the library to your local file system in XML format. Then, when you are in the Metadata Editor, you can use this saved metadata when cataloguing a new resource. NB: You can also use other IEEE or IMS metadata XML files that you have created or saved from other XML, metadata or content packaging tools. To download and reuse metadata:
 or the download icon on the resource page
  for the resource whose metadata you wish to save.
The metadata from the XML file you selected will fill in the relevant metadata fields of the resource you are working on. You can still edit this metadata for the new resource, and add additional metadata, once you have done this.
Copy metadata previously saved from another resource in intraLibrary: IntraLibrary allows you to copy the metadata record for any resource in the library. Then, when you are in the Metadata Editor, you can use this copied metadata when cataloguing a new resource. NB: Metadata only stays in the copy buffer while you are still logged in. If you log out you will need to copy the metadata again. To copy and reuse metadata:
 on the resource page whose metadata you wish to copy, and select view
metadata. This will open a
metadata view popup.
on the resource page whose metadata you wish to copy, and select view
metadata. This will open a
metadata view popup. at the top left of the metadata view
popup. A message will appear at the top of the
screen: This metadata record has been added to your copy buffer.
at the top left of the metadata view
popup. A message will appear at the top of the
screen: This metadata record has been added to your copy buffer.The metadata you previously copied will fill in the relevant metadata fields of the resource you are working on. You can copy any number of metadata records in this way; they will stay available to you in your Work Area until you have logged out of the library. You can still edit this metadata for the new resource, and add additional metadata, once you have done this.
Preserving live fields: For each of the above options for reusing metadata, certain important metadata fields from the existing metadata for the new resource (known as live fields) will be preserved. If you wish to overwrite these metadata fields, you can unselect the preserve live fields? option. The live fields are:
Avoiding duplication of fields: If the metadata for a resource already has some fields filled in, the template or copied metadata will not overwrite these fields, it will simply add another field. This means that in some cases the field will be populated twice with the same data. This will usually be because the system added metadata from your default template when you first uploaded it. Sometimes it may be because you have uploaded a content package already containing some metadata, or because someone who worked on the resource before you in a workflow added the metadata. There are a number of ways around this, e.g. ensure that you don't apply a default template to all of your resources at upload when you intend re-using metadata (go to profile then preferences and select none for Metadata template; however, your administrator may not have allowed you to have access to this option). Another way is to make sure that the metadata you copy or import doesn't populate fields that you know will already be filled in.
Classifying a Resource
Classifying a resource allows users to find it by browsing through the
library's browse tree, as an alternative
to searching. You can add any number of classifications to a resource.
The classifications go into the
resource's catalogue record, or metadata; you can see what
classifications a resource has been given
by clicking the view metadata icon:
on the resource page.
If you have copied metadata from another resource as described above, or if your administrator has set up your system to apply a template with classifications in it when you upload a resource, then there may already be classifications for the resource.
To classify a resource, go to the classification section of the
Metadata Editor. It is usually near the bottom.
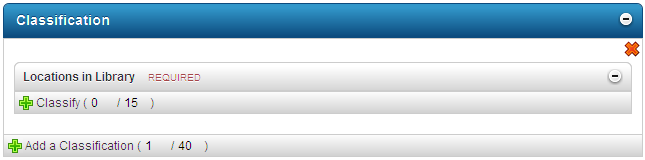
Click on the green plus sign beside Classify to open the classifications available to you. What you see will depend on the clasifications installed in your intraLibrary.
There are two ways to classify a resource:
Browse: To explore the classifications in the browse tree, use the "+" and "-" buttons to move through the hierarchy as when browsing for resources. When you have found a suitable category, click on it (that is, click on the heading, not the "+" button). Your selected classification will be added to the classification section.
Search: To search the classification tree for suitable categories, click the Search tab next to the Browse tab. Type a keyword or phrase, and click Search. You will be presented with a list of options from the classifications available. You can then select as many of these classifications by clicking as you wish by clicking on each. The classification details will at the top of the classification section.
If you wish to remove a classification once it has been selected click on the red cross to the right of the classification to be removed.
Note: If you have uploaded a resource as an IMS or SCORM content package, with classifications already in its metadata, then the resource will automatically be classified correctly in the library, if the classification information in the resource's metadata exactly matches a classification node in the library. It is particulary important that the classification has the same "source" as the associated classification system in the library. See the intraLibrary Librarian's Guide for more technical details on how classification systems work in intraLibrary.
Adding Extra Classification Information
IntraLibrary allows you to add extra information about each classification you give to a resource. Your local administrator will have determined whether you can do this; consult their guidelines for more information. In some cases the extra information will be mandatory, in which case you will see the relevant fields to be filled in when the mandatory view option is selected in the Metadata Editor. In some cases the extra information will be optional, so you will need to select the appropriate viewing option from the drop-down menu in the Metadata Editor toolbar to see and add these extra fields. The extra fields are:
Next Steps
.
For more information see below under Licensing, Copyright,
and Conditions of Use Information for Resources.If your administrator has enabled the overwrite action in your
workflow, you can overwrite
a resource with a new version, copying over the metadata from the old
resource. If this is the case you
will see overwrite resource as an icon: in your workflow actions area.
Any PublicURL linking to the old resource will now link to the new
resource. You can archive the
old version of the resource, or discard it. Old versions are known as archived
versions and the
most recent version is known as the live version. Archived
versions are available for preview and
download to users who have those permissions on the live version. You
can update the metadata for the
new version of the resource; the archived version will maintain its old
metadata. You can also undo this
overwrite as long as the resource remains in the same workflow process.
The undo overwrite action becomes
available  after you have performed an overwrite.
If your administrator has enabled the link related resources
action in your workflow, you can
link a resource to any number of other resources in the library, using
the standard relationships allowed in
LOM metadata. If this is the case you will see link related
resources as an option in the
Your workflow actions section of the resource page:
.
This link will populate the LOM Relation metadata fields in both the
linked-from and linked-to resources.
This enables related resources to be found and viewed easily by users,
using the find similar resources
button  ,
in any resource page.
,
in any resource page.
Select the link related resources option to go to the Link Related Resources Editor. In the Editor there are three ways to find resources to link to: you can carry out a simple search of published resources; you can select from My Basket; or you can select from resources that are in your reserved area. Select one of these options, and select what type of relationship you want to create. Then select which resources you wish to link to the original resource and click on Create link. All resources involved (linked-from and linked-to) will have their LOM Relation metadata updated, and the linked-to resources will appear in the Linked Resources list near the bottom of the Editor. NB: You will need to click the refresh list button to see the full list appear after linking. If you are linking a large number of resources you may need to click this several times before all linked resources appear.
Linked resources can be unlinked again, by selecting delete link
 next to the resource you wish to
unlink. This action deletes the LOM Relationship metadata in both
resources. You can start again with
another relationship and/or another search at any time.
next to the resource you wish to
unlink. This action deletes the LOM Relationship metadata in both
resources. You can start again with
another relationship and/or another search at any time.
Resources that have application profiles associated with them that do not include the LOM Relation fields or the standard LOM Relation Kind vocabulary assigned cannot be linked; nor can resources with no title or LOM identifier fields filled in, as these fields are necessary for creating links.
IntraLibrary allows rights information to be added to a resource's metadata, including copyright, licensing, and terms and conditions of use information. Because rights information is so important, it is vital to check with your local guidelines as to how to complete this part of the workflow.
Adding Basic Rights Information in the Metadata Editor
IntraLibrary allows basic rights information to be added through the Metadata Editor in the Rights and Conditions fields. See your local administrator's guidelines for more information, also see above under the section Creating and Editing Metadata: Cataloguing Resources in the Library for how to add metadata.
Adding Licences and Rights Information in the Licence Editor
Your local administrator may also have set up your library to add more
detailed rights information.
If this is the case you will see edit rights as an option in the Your
workflow actions section of the resource
page: . Selecting this option will
take you to the Licence
Editor screen. Here you will see a list of licensing options on the
left-hand screen under
Select Licence, and some metadata fields on the right-hand
screen. In some cases, you have to
select a licensing option on the left in order to see the appropriate
rights metadata fields on the right.
Some of these fields may already be filled in by a metadata template
created by your local administrator.
Saving Rights Information in the Licence Editor
Once you have selected the appropriate licence for the resource, and checked and completed any additional rights metadata fields, you can save the rights information. There are three options for saving rights information in the Licence Editor toolbar: save; save and exit; and exit editor.
The purpose of intraLibrary is to enable sharing of resources among a group of people. Therefore, the end result of uploading a new resource is to eventually make it available to others. Making a resource available to others in the library is known as publishing the resource.
Your local administrator can define multi-stage workflows for submitting
resources to the
library. A resource is published when the necessary stages in
the workflow are completed.
In the basic workflow outlined above, the resource may be published
after upload, cataloguing,
classification and adding rights information. In any case, when you
have completed your part
of a simple or complex workflow, you must click the submit to next
stage
button .
If a process has not been completed, this button will appear greyed out.
If you click on the
greyed-out button, a box will open up telling you what needs to be
completed for the resource
to be moved to the next stage.
When you have successfully completed your stage in the workflow for a resource, you will see a message at the top of the screen telling you which workflow process has been successfully completed, e.g.: "You have successfully completed process: 'Upload and Catalogue'. If the resource is published at this stage you will also see a message saying: "The resource has been successfully published to the repository".
It is possible for a resource to be in a workflow (and thus visible in
your Work Area) and to be
published at the same time. Unpublished resources have an unpublished
stamp:
 .
.
The My Resources button  in the navigation bar lists all the
resources you have ever contributed
to the library, regardless of their workflow stage or published status.
The only exceptions are resources which
have been published to a collection that you don't have permission to
access, or resources that have
subsequently been deleted from the system.
in the navigation bar lists all the
resources you have ever contributed
to the library, regardless of their workflow stage or published status.
The only exceptions are resources which
have been published to a collection that you don't have permission to
access, or resources that have
subsequently been deleted from the system.